How to Fix a Roof Leak – DIY Guide
How to Fix a Roof Leak
Stop a roof leak fast with the right materials and a methodical approach.
Fix a roof leak by locating the source from inside the loft, then repairing cracked or slipped tiles, failed flashing, or deteriorated sealant from outside. Patch small areas with roofing felt adhesive or flashing tape. For large areas, call a roofer.


- Loft torch or head torch
- Roofing ladder or roof hook
- Pry bar or slate ripper
- Caulking gun
- Stiff-bristled brush
- Trowel
- Safety harness
- Marker pen or chalk
- Roofing felt adhesive
- Self-adhesive flashing tape
- Replacement roof tiles or slates
- Lead flashing strip
- Roof and gutter sealant
- Galvanised clout nails
- Mortar mix (for ridge or flaunching repairs)
- Heavy-duty polythene sheeting (temporary cover)
Step-by-Step Guide
Locate the Leak From Inside the Loft
Start inside the loft with a torch on a dry day — water travels along rafters before it drips, so the wet patch on the ceiling is rarely directly below the entry point. Look for damp timber, dark staining, mould, or daylight showing through the roof deck. Mark the approximate location with chalk so you can find it from outside. If you need to find a roof leak from inside in more detail, follow our dedicated guide for a methodical loft inspection process.
Set Up Safe Roof Access
Never work on a roof without a properly secured roof ladder hooked over the ridge, a safety harness anchored to a fixed point, and a helper on the ground. Work only in dry, calm weather — wet or icy tiles are lethal. The HSE provides clear guidance on working at height safely (hse.gov.uk/falls). Inform someone of your plan before going up, and never lean a standard ladder directly against guttering.
Inspect the Roof Surface Systematically
Work from the ridge downward, checking tiles or slates for cracks, slips, or missing units first. Then inspect all flashing around chimneys, roof windows, and valleys — this is where the majority of leaks originate. Check that mortar bedding on ridge tiles is not cracked or hollow. Look for gaps where the roof meets a parapet wall. Fix a roof leak around a chimney requires particular attention to both the flashing and the flaunching on top.
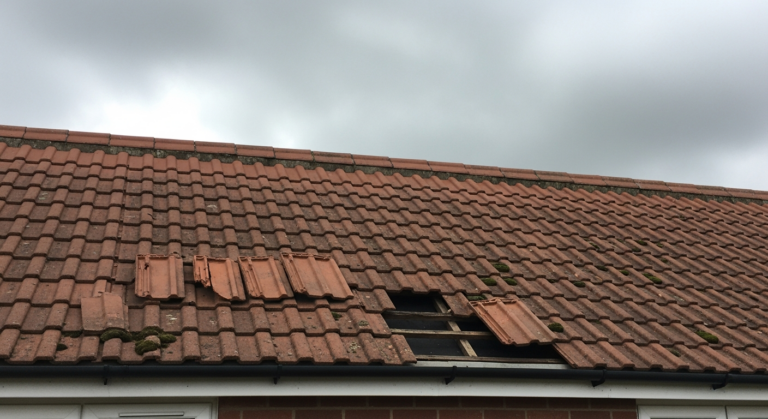
Repair Slipped or Cracked Tiles
A slipped tile can often be eased back into position and re-nailed or secured with a clip — use a slate ripper to lift the tiles above and free the fixing if needed. Cracked tiles should be replaced rather than patched; a cracked tile will fail again within one season. Slide the replacement tile into position, nail or clip it, and ensure the overlap with surrounding tiles is correct — typically a minimum 75 mm headlap for plain tiles. For full detail on this task, see our guide on how to replace a broken roof tile .
Seal Flashing and Joints
Failed lead or aluminium flashing is one of the most common causes of roof leaks in UK homes. Press self-adhesive flashing tape firmly over any lifted or cracked sections, working from the lowest point upward and overlapping edges by at least 50 mm. Use a roofing sealant in a caulking gun to seal any gaps between flashing and masonry. For step flashing along a chimney, repoint the mortar chase with fresh mortar mix if the lead is sound but the pointing has failed. Our full guide to seal roof flashing covers this in detail.
Test the Repair and Monitor Internally
Once repairs are made, wait for rain and then re-inspect the loft to confirm the leak has stopped. Do not rely on a hosepipe test alone — water pressure from a hose behaves differently to rainfall and can miss slow entry points. If dampness persists after repair, the source may be secondary — check gutters and fascias for overflow issues, and consider whether internal condensation is being confused with an active leak. Water damage to ceiling plaster or joists should be allowed to dry fully before any redecoration.
Frequently Asked Questions
Can I fix a roof leak myself or do I need a roofer?
Many common causes — slipped tiles, minor flashing failures, and cracked mortar — are within reach of a competent DIYer comfortable working at height. Structural issues, large areas of felt failure, or anything involving more than a few tiles should be left to a qualified roofer.
How do I find where a roof leak is coming from?
Start in the loft with a torch and trace damp staining back toward the ridge — water nearly always travels along a rafter before it drips. The entry point is usually higher up the roof than the wet patch below suggests. Our guide on how to find a roof leak from inside walks you through the full process.
What is the best temporary fix for a roof leak?
Heavy-duty polythene sheeting weighted down and draped over the affected area provides the most reliable temporary cover in an emergency. Self-adhesive flashing tape over a specific crack or gap is the next best option — it bonds quickly and withstands rain while you arrange a permanent repair.
How much does it cost to fix a roof leak in the UK?
A straightforward DIY repair — replacing one or two tiles and resealing flashing — typically costs £20–£80 in materials. A professional roofer charging for the same work will typically quote £150–£400 depending on access difficulty and the extent of damage, according to guidance from Which?.
Why does my roof leak only when it rains heavily?
Light rain may not generate enough volume to breach a small gap, but heavy rain overwhelms it. This often points to a partially lifted flashing joint, a hairline crack in a tile, or a blocked gutter causing water to back up and enter behind the fascia — issues that are easy to miss in a dry-weather inspection.
Before committing to an external repair, lay a board across the loft joists on a dry night and shine a torch across the underside of the roof deck at a low angle — even a pinhole gap in the felt or around a nail will show as a bright point of light, saving you hunting across the entire roof surface in the cold.
Sources
- HSE — Working at height: a brief guide — hse.gov.uk
- Which? — How to fix a roof leak — which.co.uk
- GOV.UK — Building regulations: approved document C (site preparation and resistance to contaminants and moisture) — gov.uk
This guide is for general information only. Always work safely and follow manufacturer instructions. DIYnut accepts no liability for injury or damage arising from DIY work.