How to Sand and Refinish a Hardwood Floor – DIY Guide
To sand and refinish a hardwood floor, remove furniture, punch down nail heads, sand with a drum or belt sander using progressively finer grits, edge-sand the perimeter, vacuum thoroughly, then apply your chosen finish in thin coats, allowing full drying time between each.


- Drum sander or belt floor sander
- Edge sander
- Detail sander or sanding block
- Nail punch and hammer
- Vacuum cleaner
- Paint roller and tray
- Natural bristle brush
- Moisture meter
- Coarse sanding sheets (36 or 40 grit)
- Medium sanding sheets (60 grit)
- Fine sanding sheets (80 and 100 grit)
- Wood floor filler or two-part filler
- Dust sheets and masking tape
- Hardwood floor finish (oil or lacquer)
- Tack cloths
- Protective kneepads and dust mask (P2 rated)
Step-by-Step Guide
Prepare the Room Thoroughly
Remove all furniture and rugs from the room. Punch down any protruding nail heads at least 3 mm below the surface using a nail punch and hammer — a raised nail head will tear a sanding belt instantly. Check the floor moisture content with a moisture meter; readings above 12% mean the wood is too damp to sand and finish reliably. Seal gaps around doors and the base of walls with masking tape and dust sheets to contain the considerable dust produced. If you’re unsure what finish is best for your space, our oil vs lacquer wood floor finish guide covers the key differences.
Make the First Sanding Pass with Coarse Grit
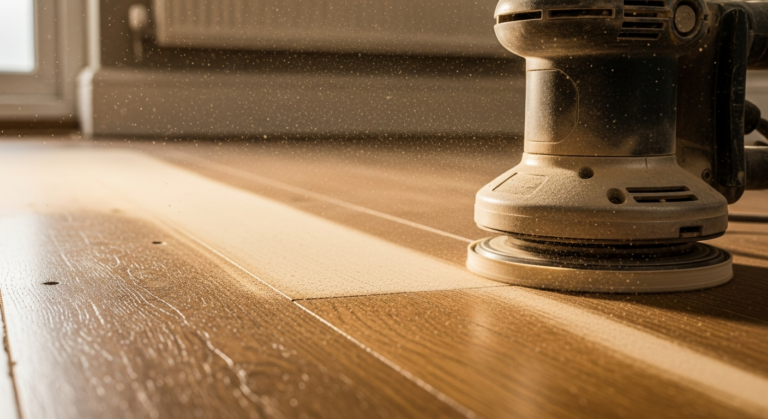
Fit a 36 or 40 grit sheet to the drum sander. Work diagonally across the boards at roughly 45 degrees on the first pass — this is the most aggressive cut and removes the old finish, deep scratches, and surface unevenness most efficiently on boards that have cupped or warped slightly. Keep the sander moving at a steady walking pace; stopping with the drum spinning will gouge the floor. Overlap each pass by about a third. Never start or finish a pass in the centre of the room — always begin and end at the wall edge.
Sand Along the Grain with Medium Grit
Swap to a 60 grit sheet and sand the entire floor parallel to the boards, working in long straight runs from one end of the room to the other. This pass removes the diagonal scratch marks left by the coarse grit and begins to level the surface. Use the edge sander with the same 60 grit paper to work the perimeter, feathering your strokes to blend with the drum-sanded area. Fill any gaps or cracks between boards with wood floor filler at this stage and allow it to cure fully before continuing.
Refine with Fine Grit and Clean the Surface
Progress through 80 grit then 100 grit, again working parallel to the boards, to achieve a smooth, even surface ready for finishing. Use a detail sander or hand-wrapped sanding block in corners the edge sander cannot reach. Once all sanding is complete, vacuum the entire floor meticulously — including along skirting boards and in corners. Wipe down with a tack cloth to remove the fine dust that vacuuming alone leaves behind; any residual dust trapped under the finish will cause a rough, gritty surface. For related guidance on preparing adjacent woodwork, see our advice on how to prep and undercoat wood correctly.
Apply the First Coat of Finish
Work with windows open for ventilation but no draughts — moving air causes lacquer to skin over too quickly and leads to lap marks. Apply the first coat of your chosen finish (oil or lacquer) along the grain using a wide brush for edges and a short-pile roller for the field area. Work away from the door so you don’t paint yourself in. Oil finishes should be worked into the wood and excess wiped off; lacquer is applied and left to cure. Allow the manufacturer’s stated drying time fully — typically 4–6 hours for lacquer, overnight for oil. If you have recently laid or are planning to lay hardwood, our guide on how to lay hardwood flooring covers subfloor preparation in detail.
Denib and Apply Final Coats
Once the first coat is fully cured, lightly denib (key) the surface by hand with a 240 grit sanding sheet or fine sanding pad — just enough to remove dust nibs and provide mechanical adhesion for the next coat. Vacuum and tack-cloth again. Apply a second coat in the same direction and allow to cure. For a lacquer finish, three coats total is standard for good durability; oil finishes typically require two coats with a light buff between them. Do not walk on the floor for the full cure time stated by the manufacturer — usually 24 hours for light foot traffic, 5–7 days before replacing heavy furniture. For broader flooring project context, visit our complete flooring guide.
Frequently Asked Questions
How many times can you sand a hardwood floor?
A solid hardwood floor with at least 6 mm of timber above the tongue can typically be sanded four to six times over its lifetime. Engineered hardwood has a thinner wear layer — usually 3–6 mm — so it may only tolerate one or two sandings before the veneer is exhausted.
Do I need to hire a drum sander or can I use a random orbital sander?
For a full refinish, hire a drum or belt floor sander — a random orbital sander lacks the cutting power to remove an old lacquer or oil finish efficiently across a full room and the job will take many times longer. Use the orbital or detail sander only for corners and intricate areas.
Is it safe to sand a floor myself?
Yes, with the right precautions. Wear a P2-rated dust mask throughout — fine wood dust is a respiratory hazard classified by the HSE. Ensure adequate ventilation, switch off pilot lights and ignition sources when using solvent-based finishes, and read all product safety data sheets before starting (HSE: hse.gov.uk/wooddust).
How long does a refinished hardwood floor last?
With proper preparation and a quality finish applied correctly, a refinished floor should last 8–15 years before needing attention again, depending on foot traffic and maintenance. High-traffic areas such as hallways will wear faster than bedrooms.
Can I sand and refinish a floor that has been previously painted?
Yes, but it requires extra care — if the existing paint contains lead (more likely in pre-1970s properties), you must test before sanding and follow HSE guidance on lead paint removal, which may require a specialist. If the floor has only been painted with modern water-based paint, start with a coarser 24 or 36 grit to cut through the paint layer before progressing through finer grits as normal.
After the first coarse sanding pass, rake a bright work light low across the floor at floor level — shadows will immediately reveal any low spots, ridges, or areas the sander missed that are invisible under normal room lighting. Address them before moving to the medium grit or they will still be visible under the final finish.
Sources
- HSE — Wood dust: Controlling the risks — hse.gov.uk
- Which? — How to sand and varnish floorboards — which.co.uk
- Historic England — Practical Building Conservation: Timber — historicengland.org.uk
This guide is for general information only. Always work safely and follow manufacturer instructions. DIYnut accepts no liability for injury or damage arising from DIY work.