How to Build Floating Shelves – DIY Guide
How to Build Floating Shelves
Strong, clean floating shelves fitted properly to any wall in an afternoon.
Build floating shelves by locating wall studs or using cavity fixings, mounting a hidden timber batten or proprietary shelf bracket, then sliding or fixing your shelf board over the top. Finish with filler, sand, and paint for a clean built-in look.


- Stud detector
- Spirit level
- Drill with bits
- Tape measure
- Pencil
- Saw
- Sanding block
- Screwdriver
- Solid timber shelf board or MDF board
- Timber batten (softwood, 50 x 38 mm)
- Wall plugs (suitable for wall type)
- Screws (75 mm for batten, 40 mm for shelf)
- Hollow wall anchors (for plasterboard spans)
- Wood filler
- Sandpaper (120 and 240 grit)
- Primer and paint or wood finish
Step-by-Step Guide
Mark Your Shelf Position on the Wall
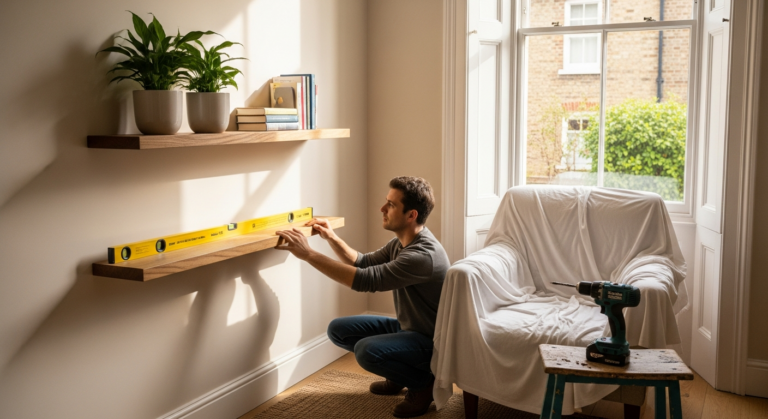
Use a tape measure and pencil to mark the shelf height on the wall, then hold a spirit level against the mark and draw a perfectly level horizontal line across the full width of the intended shelf. Getting this line accurate now saves every correction later — a shelf that looks level to the eye but isn’t will be obvious the moment you put anything on it.
Locate Studs and Plan Your Fixings
Run a stud detector across the wall along your level line and mark each stud position clearly. On a standard UK stud wall, fixings into timber studs will carry far more weight than hollow-wall anchors alone — aim for at least two stud fixings per shelf. On solid masonry, use appropriately rated wall plugs and screws throughout.
Cut and Fix the Wall Batten
Cut your 50 x 38 mm softwood batten to a length roughly 40 mm shorter than the finished shelf so it sits hidden once the board is in place. Drill clearance holes through the batten at stud or fixing positions, hold it on your level line, and transfer the drill points to the wall. Drill, plug, and screw the batten firmly — it needs to feel completely rigid before you continue, as this carries the entire load of the shelf.
Prepare and Fit the Shelf Board
Cut your shelf board to length and use a router or chisel to cut a channel (housing) along the back face of the board, sized to slot snugly over the fixed batten. Dry-fit first to check the board sits flush against the wall and is level — adjust with a plane if needed. Once satisfied, apply wood glue to the channel, slide the board onto the batten, and secure it from beneath with 40 mm screws driven up through the batten into the board. For simpler projects using proprietary floating shelf brackets, follow the same principle: fix brackets to wall, slide shelf board over them, and pin from underneath. If you’re also fitting skirting boards or other timber work in the same room, do that first so shelf heights can be planned around finished wall details.
Fill, Sand, and Finish
Fill any screw heads, gaps between the shelf and wall, and minor surface blemishes with wood filler. Once dry, sand back flush with 120 grit then 240 grit for a smooth finish. Apply a coat of primer to bare MDF or timber, then finish with two coats of your chosen paint or wood finish — proper prep and undercoat on wood makes a significant difference to the final result and durability.
Check Load and Dress the Shelves
Before loading the shelves, give the fixings a firm downward push to confirm nothing moves. As a guide, a well-fixed batten into two studs on a standard stud wall will hold typical decorative or book loads comfortably — but always err on the side of more fixings for heavier loads such as books or kitchen items. Once satisfied, dress the shelves and step back to check the finished result is level and flush to the wall.
Frequently Asked Questions
How much weight can a floating shelf hold?
Weight capacity depends entirely on wall type, number of fixings, and whether you’ve hit studs or masonry. A batten fixed into two timber studs on a stud wall can typically carry 20–30 kg spread evenly, but always use more fixings for heavier loads and check the anchor manufacturer’s rated load for hollow-wall situations.
Can I fit floating shelves on a plasterboard wall?
Yes, but you must either locate and fix into the timber studs behind the plasterboard, or use correctly rated hollow-wall anchors. Standard wall plugs will not grip in plasterboard — the shelf will fail under load if you use them.
What is the best timber for floating shelves?
Solid hardwood (oak, ash) gives the best finish and strength for visible shelves. Softwood pine is a cost-effective option that takes paint well. MDF is ideal for painted shelves but is heavier and does not tolerate moisture — avoid it in bathrooms or kitchens without sealing all edges thoroughly.
How do I make floating shelves look built-in?
Fill every gap between the shelf and the wall with decorator’s caulk, and sand the shelf surface flush before painting. Matching the shelf colour to the wall or using a feature wall approach gives a seamless, built-in appearance that reads as architectural rather than added on.
How do I find the studs in my wall?
Use a battery-powered stud detector, available from any builders’ merchant. Run it slowly across the wall at the fixing height and it will signal when it passes over a stud. Confirm the find by drilling a small pilot hole — if you hit resistance after 12–15 mm (the plasterboard depth) you’ve found timber. UK stud walls are typically spaced at 400 mm or 600 mm centres. For further timber joinery guidance, see our Timber & Joinery Guide.
When fixing a batten to a masonry wall, use a 10 mm masonry bit and 10 mm plugs with 8 mm screws rather than the standard 6 mm combination — the extra diameter grips far better in older, softer brick and won’t loosen under cyclical load from shelves that get regularly loaded and unloaded. Drill at least 60 mm into the masonry past the plaster layer to get a proper bite.
Sources
- HSE — Safe use of ladders and working at height for DIY tasks — hse.gov.uk
- Which? — How to put up shelves — which.co.uk
- Gov.uk — Building regulations: what you need approval for — gov.uk
This guide is for general information only. Always work safely and follow manufacturer instructions. DIYnut accepts no liability for injury or damage arising from DIY work.