How to Repair Felt on a Flat Roof – DIY Guide
How to Repair Felt on a Flat Roof
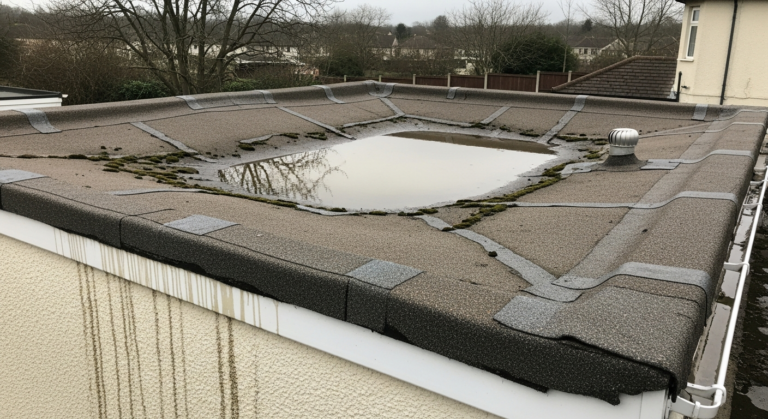
Patch damaged roofing felt yourself and stop leaks before they cause serious damage.
To repair felt on a flat roof, clean the damaged area, cut away any split or bubbled felt, prime the deck, apply a patch of compatible roofing felt bonded with cold-applied bitumen adhesive or torch-on torch, and seal all edges. Most small repairs take 2–3 hours.


- Stiff-bristle brush
- Craft knife or roofing knife
- Paint brush (for adhesive)
- Seam roller or wallpaper seam roller
- Tape measure
- Chalk line or straight edge
- Safety harness or roof anchor point
- Ladder with standoff bracket
- Mineral-surfaced roofing felt (matching existing grade)
- Cold-applied bitumen adhesive
- Bitumen primer
- Roofing felt overlap tape
- Fine-grade abrasive paper or wire brush
- White spirit or solvent cleaner
- Roofing felt lap seal compound
- Plastic or galvanised clout nails (if re-securing edges)
Step-by-Step Guide
Inspect and Assess the Damage
Before touching anything, walk the roof carefully and identify every area of damage — splits, blisters, lifted seams, and pooling zones. Small isolated splits are patchable; if more than a third of the surface is cracked, blistered, or delaminated, a full re-felt is the better call. Check the roof deck beneath any obvious damage for soft spots, which indicate wet or rotted timber that must be replaced before patching. For guidance on identifying where water is entering, see our guide on how to fix a roof leak.
Clean and Prepare the Area
Sweep away all debris, moss, and standing water from the repair zone using a stiff-bristle brush. Use white spirit on a cloth to degrease the felt surface around the damage — adhesive will not bond to a dirty or oily surface. If the existing felt has a mineral surface (chipping), scrape the granules back 75 mm beyond the cut edge of your patch area using the back of a roofing knife. A clean, dry, contaminant-free substrate is the single most important factor in a lasting repair.
Cut Out and Remove Damaged Felt
Use a craft knife and straight edge to cut a clean rectangle around the damaged section, extending at least 50 mm into undamaged felt on all sides. For blisters, cut a cross through the centre, fold back the four flaps, allow the moisture trapped inside to fully evaporate (this may take 30–60 minutes on a dry day), then press the flaps back flat. If the cut reveals a soft or punky deck beneath, cut back the deck boards to the nearest joist and fit new exterior-grade plywood or OSB3 board before proceeding. If the damage is linked to a nearby roof penetration, our guide to fixing a roof leak around a chimney covers flashing repairs alongside felt work.
Prime and Apply Bitumen Adhesive
Brush bitumen primer over the cleaned repair area and allow it to become touch-dry — typically 15–30 minutes depending on temperature. Apply an even coat of cold-applied bitumen adhesive to both the primed deck and the underside of your patch using a paint brush. Work the adhesive right to the edges of both surfaces. Cold-applied adhesive is the safest DIY option; torch-on felt requires a gas torch and carries a significant fire risk on timber decks — if you are not trained in torch-on technique, stick to cold-bond. For larger-scale emergencies where water is already entering, see the emergency roof repair guide for temporary stop-gap measures.
Apply and Bond the Patch
Cut your replacement roofing felt patch so it overlaps the repair area by a minimum of 75 mm on all sides, matching the orientation of the existing mineral surface. Press the patch firmly into the adhesive starting from the centre outward to avoid trapping air. Run a seam roller firmly over the entire patch and pay extra attention to the edges — lifted edges are the most common point of re-failure. Apply a second bead of lap seal compound along all four edges of the patch and tool it smooth with a brush. If the existing roof has multiple felt layers and the top layer only is damaged, the patch should match that top layer specification to shed water correctly.
Check Drainage and Finish
Once the adhesive has cured (check the product data sheet — typically 2–4 hours for cold-bond), check that the repaired area sits flush and that water will drain away from the patch edges rather than pooling against them. Clear any debris from gutters and downpipes that may have been dislodged during work — blocked outlets are a leading cause of flat roof ponding and premature felt failure. For ongoing gutter maintenance, our guide to clearing blocked gutters covers the full process.
Frequently Asked Questions
Can I repair flat roof felt myself or do I need a roofer?
Small isolated splits, blisters, and lifted seams are well within DIY range using cold-applied bitumen adhesive and compatible felt patch material. If the damage covers a large area, if the timber deck is rotten, or if the roof is close to the end of its service life, a professional re-felt is the more cost-effective long-term answer.
What is the best time of year to repair roofing felt?
Dry, mild weather between April and September gives the best results — adhesives cure correctly and felt is more pliable. Cold-applied adhesive has a minimum application temperature (typically 5°C); below this the product will not bond reliably. Never apply to a wet or frosted surface.
How long does a felt patch repair last?
A correctly primed and bonded felt patch on a sound deck can last 5–10 years or more. Longevity depends heavily on surface preparation, adhesive quality, and how well the patch edges are sealed. If the surrounding felt is already aged and brittle, a full re-felt will outlast repeated patching. Our guide to fixing a leaking flat roof covers when patching stops being cost-effective.
Do I need planning permission to repair flat roof felt?
Like-for-like repairs to existing flat roofing felt do not require planning permission in England and Wales. If you are changing the roof covering material or raising the roof height, permitted development rules and Building Regulations may apply — check with your local planning authority before proceeding.
What are the signs that a flat roof needs a full re-felt rather than a repair?
If the felt is cracking across more than a third of the surface, has multiple blistered or delaminated areas, is more than 15–20 years old, or if the deck beneath is soft in more than one location, a full re-felt is more cost-effective than repeated patches. Persistent internal damp after repairs have been made is another strong indicator that the roof covering has reached the end of its useful life.
Before bonding any patch, hold a dry cloth firmly over the cut-out area for 60 seconds and check for any condensation forming on the underside — even slightly damp felt will off-gas through a cold-bond adhesive and lift the patch within months. If there’s any doubt, leave the area open to dry for a full day before proceeding.
Sources
- HSE — Work at Height Regulations 2005: guidance for low-slope and flat roofs — hse.gov.uk
- Which? — Flat roof repair: what you need to know — which.co.uk
- GOV.UK — Planning Portal: permitted development for householders — planningportal.co.uk
This guide is for general information only. Always work safely and follow manufacturer instructions. DIYnut accepts no liability for injury or damage arising from DIY work.