How to Lay Laminate Around Doors – DIY Guide
To lay laminate around doors, undercut the door frame and architrave so the board slides underneath, then scribe and cut the board to fit the door stop profile. This gives a clean, professional finish without gaps. Allow a 10 mm expansion gap at all fixed edges.

- Multi-tool or flush-cut saw
- Jigsaw
- Tape measure
- Pencil
- Combination square
- Pull saw or handsaw
- Chisel
- Safety glasses
- Laminate flooring boards
- Underlay offcut (for setting saw depth)
- Laminate adhesive or pull bar
- Door bar threshold strip
- Expansion gap spacers
- Masking tape (to protect board face during cutting)
Step-by-Step Guide
Measure the undercut depth needed
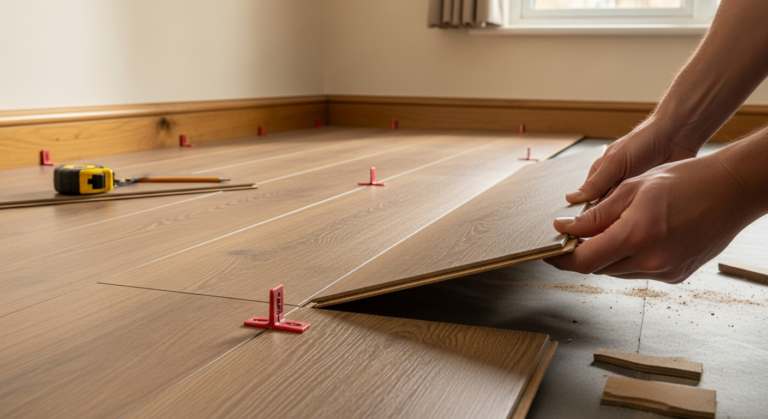
Place a piece of underlay flat on the subfloor beside the door frame, then lay a spare laminate board on top of it. Mark the combined height on the door frame or architrave — this is the exact depth you need to undercut. Getting this measurement right means the finished board slides cleanly underneath without forcing the fit or leaving a visible gap. Before you start cutting, put on your safety glasses to protect against dust and debris from the saw.
Undercut the door frame and architrave
Using a multi-tool fitted with a flush-cut blade, or a purpose-made flush-cut saw, carefully cut horizontally across the base of each door frame leg and the architrave at the height you marked. Work slowly and keep the blade flat against the offcut board to maintain a consistent depth. A good flooring guide will always stress that undercutting door frames is the single biggest difference between a DIY finish and a trade finish — this step is non-negotiable.
Scribe the board profile around the door stop
The door stop — the raised timber rebate that the door closes onto — creates an irregular shape the board must fit around. Slide the board into position and use a pencil and combination square to transfer the exact profile of the door stop onto the face of the board. For a hollow door casing, you may need to cut a notch on two planes: one horizontal cut for the depth of the door stop and one vertical cut for the thickness. Take your time here — an accurate scribe means no visible gaps once the board is tapped home. If you are also planning to fit skirting boards in the same room, complete the flooring first so the skirting can sit on top and conceal the expansion gap.
Cut the board accurately with a jigsaw
Apply masking tape along the cut line on the face of the board to reduce chipping, then make the cuts with a jigsaw fitted with a fine-tooth laminate blade. Cut with the face side down if your jigsaw cuts on the upstroke, or face side up if it cuts on the downstroke — check your blade first. Make the horizontal cut before the vertical one so there is less risk of the offcut snapping away and tearing the face. Test-fit the board before clicking it fully into the previous row; adjustments are far easier before the board is locked in place.
Slide the board under the frame and lock it in
Apply light pressure and slide the cut end of the board underneath the undercut frame until the tongue engages with the groove of the previous row. Use a pull bar and rubber mallet to tap the board fully home — never strike the board directly with a hammer. Check that the notched section sits flush against the door stop with no rocking or lifting. If the fit is too tight, pare back the notch with a sharp chisel in small increments rather than re-cutting the whole board. For more detail on how to lay laminate flooring across the rest of the room, see our full step-by-step guide.
Fit the threshold strip at the doorway
Where the laminate meets another floor surface in the doorway, fit a door bar threshold strip to bridge the join and cover the expansion gap. Most threshold strips are either clip-down or screw-fixed to the subfloor — follow the manufacturer’s method for your specific profile. Position the threshold strip centrally under the door so it is hidden when the door is closed. Trim it to the exact width of the doorway with a hacksaw or multi-tool, then snap or screw it down. A neatly fitted threshold is the finishing detail that makes the whole job look professional.
Frequently Asked Questions
Do I need to remove the door to lay laminate underneath it?
In most cases, yes — lifting the door off its hinges gives you much better access and reduces the risk of accidentally catching the blade on the door when undercutting. Rehang it once the floor is in and check the clearance; you may need to plane a small amount off the bottom of the door if it now drags on the new floor surface.
What type of saw is best for undercutting a door frame?
A multi-tool with a flush-cut blade is the most controllable option — you can see exactly where the blade is and it is easy to keep flat against the offcut guide board. A purpose-made flush-cut saw works well too. Avoid using a standard panel saw, as it is difficult to keep the cut horizontal and at a consistent depth.
How much expansion gap should I leave at the door frame?
Leave a minimum of 10 mm between the end of the board and any fixed vertical surface, including door frames and linings. This gap will be hidden by the undercut frame or covered by the threshold strip, so it never shows in the finished floor. Guidance from flooring manufacturers consistently specifies 10–12 mm as the minimum. For advice on choosing the best underlay for laminate, see our dedicated guide.
My door frame has a complex moulded profile — how do I copy it accurately?
Use a profile gauge (a comb-style tool with sliding pins) pressed against the frame to copy the exact cross-section onto card, then transfer that shape onto the board. Alternatively, hold the board in position and use a pencil run along the profile by hand — make two or three passes to confirm the line is accurate before cutting.
Can I lay laminate under a door frame without a flush-cut saw?
You can use a sharp chisel and a pull saw to remove the material by hand, but it is slower and harder to keep the cut level. A multi-tool is worth hiring if you do not own one — it will pay for itself in accuracy and time saved, especially if you have multiple door openings to deal with. You can find tool hire at most builders’ merchants. For guidance on repairing a chipped laminate floor if a cut goes wrong, see our repair guide.
When scribing a board to a door stop, make the horizontal cut first and the vertical cut second — this stops the offcut piece from tearing across the face of the board as the jigsaw blade exits. Mark both cut lines with masking tape and score along the tape edge with a utility knife before cutting; this shears the surface layer cleanly and virtually eliminates chipping on even the glossiest laminate finishes.
Sources
- HSE — Wood dust: health effects and safe working — hse.gov.uk
- Which? — How to lay laminate flooring — which.co.uk
- NHBC — Timber and laminate flooring installation guidance — nhbc-standards.co.uk
This guide is for general information only. Always work safely and follow manufacturer instructions. DIYnut accepts no liability for injury or damage arising from DIY work.