How to Seal Around a Basin – DIY Guide
To seal around a basin, clean and dry the gap completely, apply low-modulus sanitary silicone sealant in one continuous bead, smooth with a damp finger or tool, and leave to cure for 24 hours before using the basin.

Clean and dry the surfaces thoroughly
Wipe both the basin edge and the wall or tile surface with isopropyl alcohol or white spirit on a clean cloth to remove soap residue, grease, and moisture. Allow the area to dry completely — silicone will not cure or adhere properly to damp surfaces. Open a window or run an extractor fan to help dry the area faster. This is the step most DIYers rush, and it is the main reason new seals fail early.
Apply masking tape for clean edges
Run two strips of masking tape — one along the basin and one along the wall — leaving a gap of 4–6 mm between them. This defines the width of your finished bead and ensures crisp straight edges without smearing sealant onto the surrounding surface. Press the tape down firmly so sealant cannot bleed underneath it.
Apply the silicone sealant in one continuous bead
Load the tube into a caulking gun and cut the nozzle at a 45-degree angle to match the width of your gap. Hold the gun at a consistent 45-degree angle and pull it steadily along the full length of the joint without stopping — pausing mid-run leaves weak spots. Use a sanitary-grade, low-modulus silicone sealant that is mould-resistant and rated for use in wet areas. For related basin work, see our guide on how to replace bathroom taps before resealing if your taps also need attention.
Smooth the bead and remove the tape
Dip a smoothing tool or your fingertip in clean water and run it along the bead in one smooth stroke to press the sealant into the joint and create a concave finish. Pull the masking tape away immediately — before the sealant skins — by peeling it back at a low angle. Removing the tape too late tears the edges of the bead and leaves a ragged finish.
Leave to cure fully before using the basin
Allow the sealant to cure for a minimum of 24 hours before getting it wet, and check the product instructions — some formulations require up to 48 hours for full cure. Keep the bathroom ventilated during this period to help the sealant off-gas properly. A properly cured sanitary silicone seal should remain flexible and mould-resistant for several years under normal use.
Frequently Asked Questions
What type of sealant should I use around a basin?
Use a low-modulus sanitary silicone sealant that is specifically labelled as mould-resistant and suitable for wet areas. Avoid standard decorator’s caulk or general-purpose silicone, which are not formulated to handle the constant moisture exposure around a basin.
How long does silicone sealant take to cure around a basin?
Most sanitary silicone sealants are touch-dry within 30–60 minutes but require at least 24 hours before contact with water. Some products specify up to 48 hours for a full cure — always check the manufacturer’s instructions on the tube.
Can I seal around a basin myself, or do I need a plumber?
Applying silicone sealant around a basin is a beginner-level DIY task that does not involve any plumbing connections. You do not need to isolate the water supply or disturb any pipework. If you are concerned about a tap that won’t turn off or a leak from the pipework itself, that is a separate issue that may need a WaterSafe-registered plumber.
How do I remove old silicone sealant cleanly?
Score along both edges with a Stanley knife, peel the bead away, then apply a silicone remover solution to any remaining residue. Leave it for 10–15 minutes to soften, then scrape off with a plastic tool to avoid scratching the basin or tiles. Finish by wiping the area with isopropyl alcohol. For more detail on keeping drains clear during this kind of maintenance, see our guide to fixing a slow-draining sink.
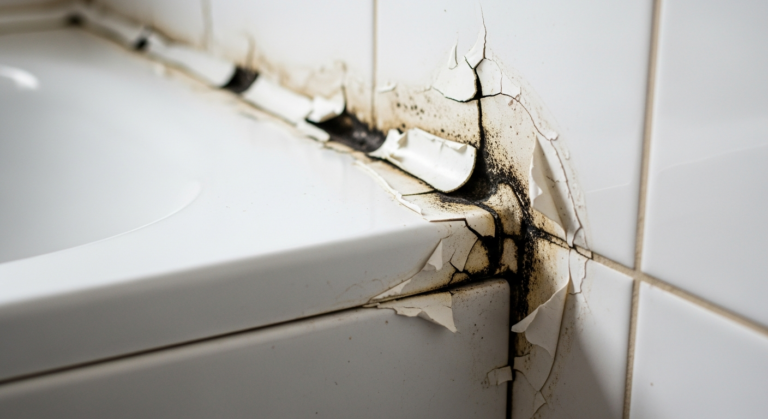
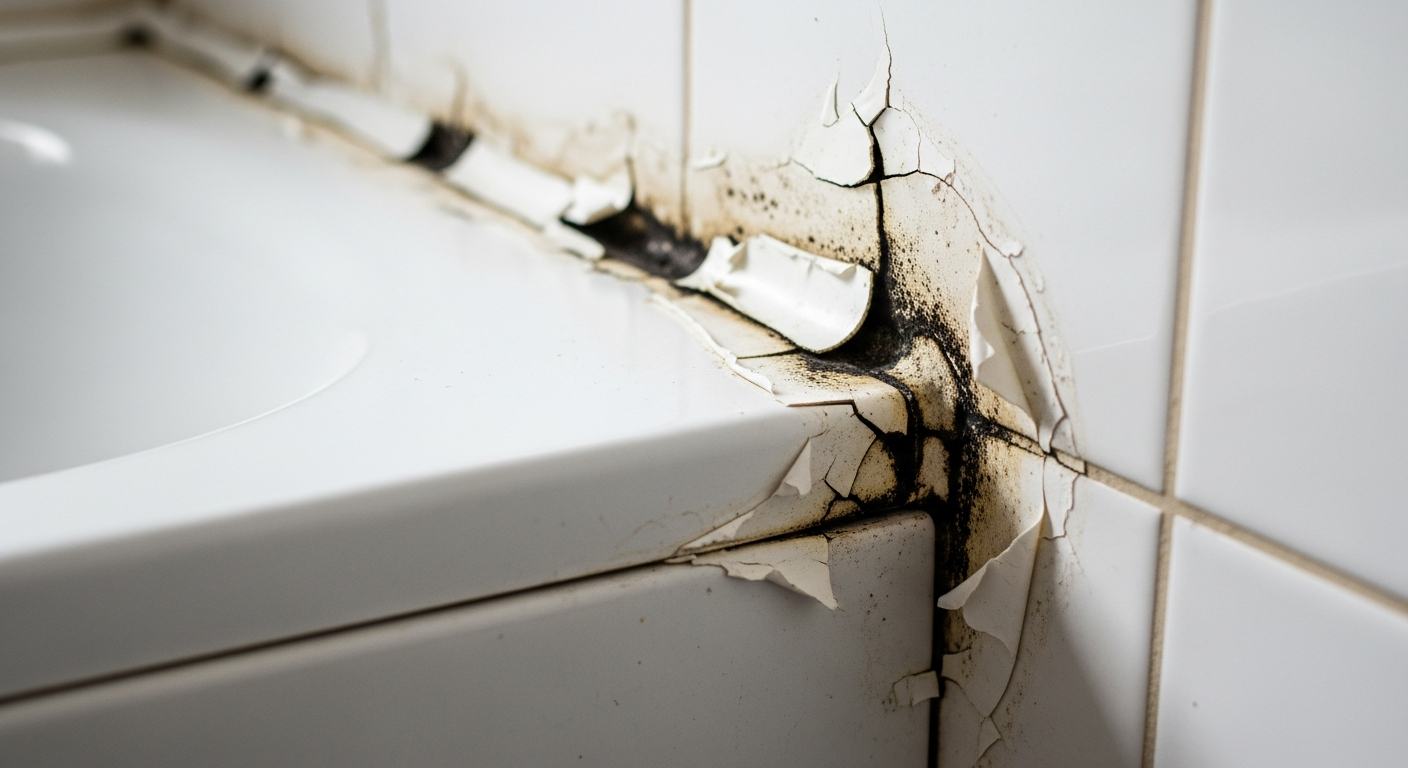
Why does my new sealant keep going mouldy?
Mould on sealant is almost always caused by poor ventilation and persistent moisture. Ensure your bathroom has adequate ventilation — either a window or a working extractor fan — and wipe the basin joint dry after use where possible. Using a sealant with an integrated fungicide (look for ‘mould-resistant’ on the packaging) will also significantly extend the life of the seal. Our guide on how to prevent bathroom mould covers the full ventilation approach.
Fill the basin with water before applying the sealant, then drain it after it has fully cured. The weight of water pushes the basin down to its in-use position, so the sealant cures at the correct gap width — preventing it from tearing when the basin is loaded and unloaded in everyday use.
Sources
- HSE — Biological agents: managing the risks in the workplace (mould and damp guidance) — hse.gov.uk
- WaterSafe — Find an approved plumber — watersafe.org.uk
- Which? — How to seal a bath or shower — which.co.uk
Safety Notice: Electrical and plumbing work can be dangerous if done incorrectly. In the UK, certain electrical work must comply with Part P of the Building Regulations and certain plumbing work with Part G. If in doubt, consult a qualified electrician (NICEIC/NAPIT registered) or plumber (CIPHE/WaterSafe registered). This guide is for general information only — it is not a substitute for professional advice.