How to Ventilate a Bathroom Properly – DIY Guide
How to Ventilate a Bathroom Properly
Stop damp, mould, and condensation with the right ventilation solution for your bathroom.
Bathroom ventilation guide: fit an extractor fan rated at least 15 litres per second, positioned close to the shower or bath. Ensure ducting routes directly outside — not into a loft — and use a humidistat-controlled fan for best results. Adequate ventilation is required under Part F of the Building Regulations.

- Drill with masonry and wood bits
- Jigsaw or hole saw
- Screwdriver (flat and cross-head)
- Tape measure
- Pencil
- Spirit level
- Voltage tester
- Safety glasses
- Extractor fan unit (15 l/s minimum rated)
- Rigid or semi-rigid ducting (100 mm or 125 mm diameter)
- External wall vent grille with backdraught shutter
- Duct tape (foil-backed)
- Duct connector and reducer (if required)
- Cable clips and twin-and-earth cable (1 mm²)
- Sealant (neutral-cure silicone)
- Wall plugs and fixing screws
Step-by-Step Guide
Establish your ventilation requirement
Under Part F of the Building Regulations, an intermittent extractor fan in a bathroom must achieve a minimum extract rate of 15 litres per second (54 m³/h). Measure your bathroom’s volume (length × width × height) and check that your chosen fan meets the required rate for the room size. Bathrooms with a shower enclosure or bath benefit from a fan rated at 22–30 l/s. If the room has no openable window, continuous mechanical ventilation is required by regulation. Check the Bathroom Guide for a full overview of what Building Regulations apply to bathroom work.
Choose the right fan and control type
Select a fan suitable for your bathroom zone: fans installed within Zone 1 (directly above or around the bath or shower to 2.25 m height) must be rated IPX4 (splash-proof) or higher. Zone 2 fans (0.6 m beyond Zone 1) must be at least IPX4. Beyond Zone 2, a standard indoor fan is acceptable. A humidistat fan is the most effective control type — it detects rising moisture and switches on automatically, then runs on until humidity drops, without relying on the occupant remembering to use it. Timer-overrun fans are a lower-cost alternative. Avoid fans without any overrun function.
Plan and mark your ducting route
The duct must terminate outside the building — never into a loft, roof space, or void. The shortest, most direct route with the fewest bends will give the best airflow; every 90° bend reduces effective performance significantly. Mark the fan position on the ceiling or wall close to the source of moisture — above or adjacent to the shower or bath. Mark the corresponding exit point on the external wall or through the soffit. Use a spirit level to keep the run as level as possible or with a very slight fall outward to prevent condensation pooling inside the duct.
Cut openings and install the ducting
Core or drill out the external wall opening to suit your duct diameter (typically 100 mm or 125 mm) using a masonry bit and hole saw. Feed the ducting through, ensuring it sits flush or slightly proud of the external face. Fit the external wall grille with an integral backdraught shutter — this prevents cold draughts and pest entry when the fan is off. Seal around the grille on both faces with neutral-cure silicone. Join all duct sections with foil-backed duct tape — standard PVC tape is not adequate and will fail in a damp environment. If your wall construction is cavity, use a purpose-made telescopic duct sleeve.
Wire and connect the fan safely
Electrical work in a bathroom is governed by Part P of the Building Regulations. A qualified electrician must carry out or certify any new circuit or wiring alteration in a bathroom — this includes connecting a fan to the lighting circuit if it is not a simple like-for-like replacement. Use a voltage tester to confirm the supply is isolated before touching any wires. For like-for-like replacement of an existing fan on an existing spur, competent DIYers can complete the work, but must ensure the installation complies with BS 7671. If in doubt, use an NICEIC-registered electrician. Connect the fan according to its wiring diagram and check operation before closing up. Never use a switched fused spur inside a bathroom zone. Keep wiring away from water sources and clip cables securely.
Test airflow and check for condensation issues
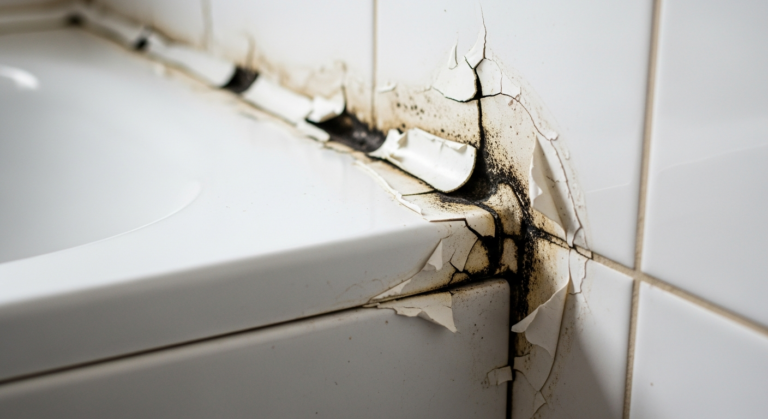
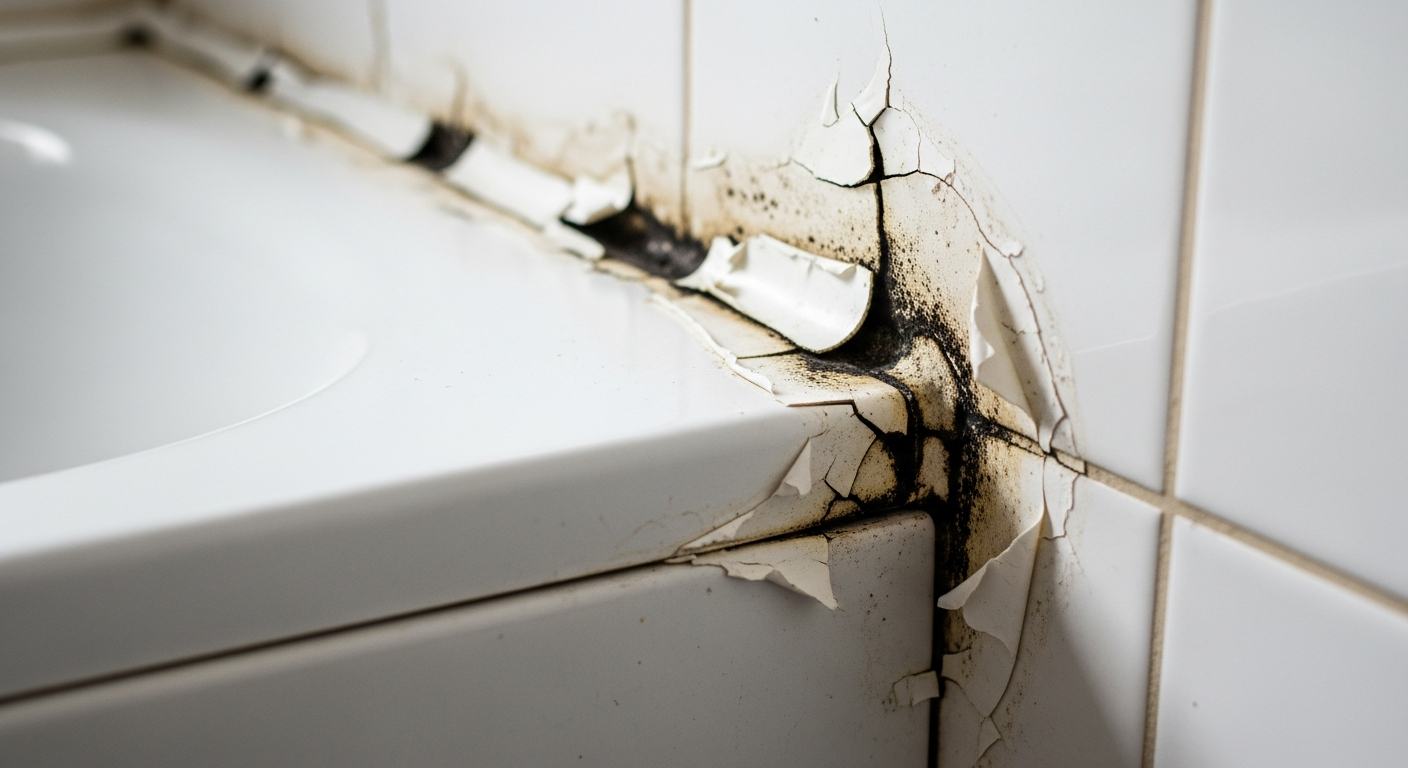
Switch the fan on and hold a piece of tissue paper near the inlet grille — it should be drawn firmly against the grille and held in place. Run the shower or fill the bath with hot water and verify the fan activates (or activates automatically if humidistat-controlled) and that steam clears within a few minutes. Check all duct joints and the external grille seal. If condensation still forms on walls or ceilings after installation, the ducting run may be too long or restricted — re-inspect for kinks or additional bends. Persistent mould growth after installing a fan may indicate an underlying mould problem on the bathroom ceiling that needs treating separately.
Frequently Asked Questions
Do I need an extractor fan if my bathroom has a window?
Under Part F of the Building Regulations, an openable window with an area of at least 1/20th of the floor area is the minimum for a bathroom — but a fan is strongly recommended in addition. Windows alone rarely provide consistent enough ventilation to prevent condensation and mould, especially in winter when residents keep windows closed.
Can I install a bathroom extractor fan myself?
Like-for-like replacement of an existing fan using the existing electrical connection is within the scope of a competent DIYer. Any new wiring, new circuits, or electrical alterations in a bathroom must be carried out or certified by a Part P-registered electrician — find one at NICEIC Find a Contractor. Always isolate the supply and use a voltage tester before starting.
What is the minimum extract rate for a bathroom fan?
Part F of the Building Regulations specifies a minimum intermittent extract rate of 15 litres per second (54 m³/h) for a bathroom. A room containing a shower or bath will benefit from a fan rated at 22–30 l/s to clear steam effectively.
Why does my bathroom still get mouldy even though I have an extractor fan?
The most common reasons are a duct that terminates in the loft rather than outside, a duct run that is too long or has too many bends restricting airflow, or a fan that is not left running long enough after bathing. Check your bathroom mould prevention approach alongside fixing the ventilation. A humidistat fan that runs until humidity drops is the most reliable solution.
What is the best type of extractor fan for a bathroom?
A humidistat-controlled fan is widely considered the most effective option — it automatically detects moisture and continues running until humidity returns to a normal level, without relying on anyone remembering to switch it on. For bathrooms without a window, a continuous low-rate fan with boost function meets Part F requirements for continuous mechanical ventilation.
When running rigid ducting through a cold external wall, wrap the last 300 mm of ducting inside the wall with mineral wool insulation before sealing it in. This prevents warm moist air from hitting a cold surface and condensing inside the duct, which is the leading cause of water dripping back out of the fan grille in winter.
Sources
- HSE — Approved Document F: Ventilation (2021 edition) — gov.uk
- NICEIC — Electrical work in bathrooms and Part P compliance — niceic.com
- Which? — Bathroom extractor fans: buying guide and fitting advice — which.co.uk
Safety Notice: Electrical and plumbing work can be dangerous if done incorrectly. In the UK, certain electrical work must comply with Part P of the Building Regulations and certain plumbing work with Part G. If in doubt, consult a qualified electrician (NICEIC/NAPIT registered) or plumber (CIPHE/WaterSafe registered). This guide is for general information only — it is not a substitute for professional advice.