Spring Driveway Repair
Driveways & External › Driveways & External
Spring Driveway Repair
Catch winter damage early and restore your driveway before small cracks become costly problems.
Spring driveway repair means inspecting for frost damage, filling cracks, clearing weeds, and cleaning surfaces while temperatures are rising. Tackle repairs in March–April before heat seals in moisture or cracks widen further. Most tasks are beginner-friendly and take half a day.

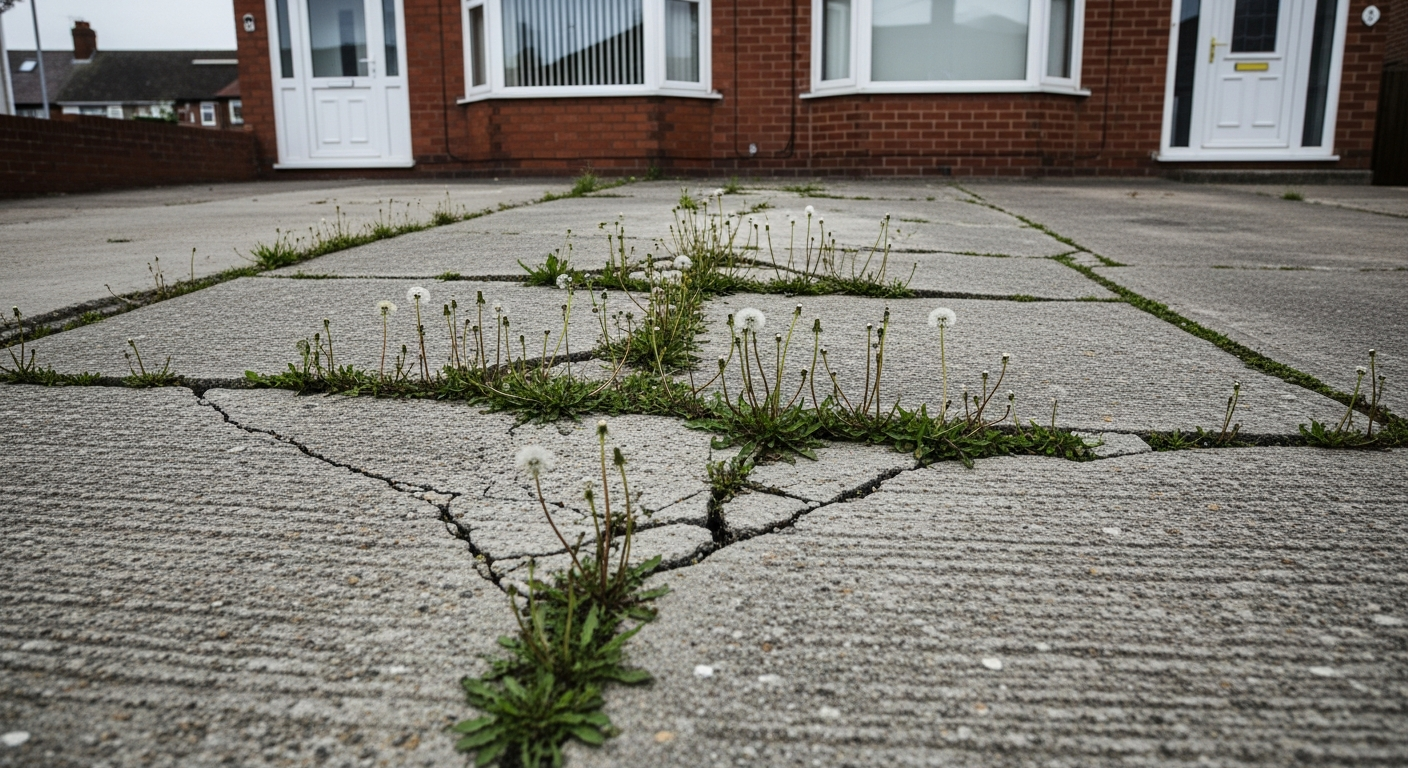
Why This Season Matters
Winter is the harshest season for driveways. Freeze-thaw cycles force water into hairline cracks, expanding them as it freezes and leaving behind larger voids when it thaws. By the time spring arrives, surfaces that looked fine in October can show significant cracking, crumbling edges, and heaved slabs.
Acting in March or April — once overnight temperatures consistently stay above 5°C — gives repair materials the right conditions to cure properly. Leave it until summer and cracks widen further, weeds take hold, and what was a simple patch job can become a full resurfacing project.
Your Complete Checklist
- Inspect the full driveway surface for cracks and frost heave — Driveways & External Guide
- Fill and seal cracks in tarmac surfaces — Repair Tarmac Cracks
- Repair cracked or spalled concrete areas — Repair a Cracked Driveway
- Repoint sunken or loose block paving joints — Point a Block Paved Driveway
- Top up and redistribute gravel that has migrated over winter — Stop Gravel Spreading on Driveway
- Remove oil stains left by winter vehicle use — Remove Oil Stains from Driveway
- Pressure wash the entire surface to remove winter grime, algae, and moss — Pressure Wash a Driveway
- Clear weeds from joints and edges before they root deeply
- Check and clear any drainage channels or gullies of leaf debris
- Inspect driveway edging for movement or damage and re-bed loose sections
- Reseal a tarmac surface if it shows widespread surface weathering — Reseal a Tarmac Driveway
- Repair any crumbling concrete steps at the driveway entrance — Fix Crumbling Concrete Steps
Step-by-Step for Each Task
Filling tarmac cracks: Sweep the crack clean and remove any loose material with a cold chisel. Blow out dust with a foot pump or compressed air. For cracks under 10 mm, apply a brush-in tarmac crack filler and work it fully into the void. For wider gaps, use a cold-lay tarmac repair compound, tamp firmly with a block of timber, and feather the edges level with the surrounding surface. Allow 24 hours before driving over it.
Patching concrete: Cut back any crumbling edges to a clean, sound face using a cold chisel and club hammer — do not leave feathered edges or the patch will de-bond. Dampen the area, apply a concrete bonding agent, then fill with a rapid-setting concrete repair mortar. Trowel flush and cover with polythene sheeting for 24 hours to slow the cure and prevent cracking.
Redistributing gravel: Rake the entire surface to level high and low spots caused by traffic and winter rain wash. Where gravel has spread onto lawns or paths, collect it and return it to the drive. If the surface is visibly thin in areas, top up with matching aggregate. Check that any edge restraints are still upright and firmly fixed — this is the most effective way to prevent future migration.
Pressure washing: Work from the highest point of the driveway downward so dirty water drains away from cleaned sections. Use a wide fan nozzle and keep the lance moving to avoid etching concrete or dislodging block paving sand. After washing, allow the surface to dry fully before applying any sealant or filler, as trapped moisture will prevent adhesion.
Tools and Materials You’ll Need
- Cold chisel and club hammer
- Wire brush and stiff-bristled hand brush
- Tarmac crack filler (brush-in type)
- Cold-lay tarmac repair compound
- Concrete repair mortar (rapid-setting)
- Concrete bonding agent / PVA
- Pointing sand or kiln-dried jointing compound (for block paving)
- Weed killer or path-and-drive weedkiller gel
- Pressure washer with fan nozzle
- Rake and garden broom
- Tamping block (short offcut of timber)
- Polythene sheeting (for curing concrete patches)
- Safety glasses and work gloves
- Kneeling pad
Common Mistakes to Avoid
- Repairing too early in the season: Applying tarmac fillers or concrete mortars when overnight temperatures are still dropping below 5°C causes the material to cure too slowly or crack as it freezes. Check a five-day forecast before starting.
- Skipping surface preparation: Brushing filler into a dusty or wet crack without cleaning it out first is the single most common reason patches fail within weeks. Clean, dry, and sound edges are not optional.
- Pressure washing before filling cracks: Forcing water deep into open cracks and then immediately applying filler traps moisture, which leads to de-bonding and frost damage in the following winter. Always fill first, then wash around the repair once it has cured.
- Feathering concrete patch edges: Thin edges on concrete repairs crack and lift quickly under tyre weight. Always cut repairs back to at least 10–15 mm depth around the perimeter before patching.
- Ignoring drainage: Blocked gullies and channels cause standing water that accelerates surface deterioration. Clearing them in spring is as important as the visible surface repairs.
Frequently Asked Questions
When is it warm enough to carry out spring driveway repairs in the UK?
Most driveway repair materials — tarmac compounds, concrete mortars, and sealants — require ambient temperatures consistently above 5°C, including overnight. In most of England and Wales this means from mid-March onwards, though in Scotland and higher elevations early April is safer.
Can I repair tarmac cracks myself or do I need a contractor?
Isolated cracks and small potholes are well within DIY capability using cold-lay repair compound and brush-in fillers widely available from builders’ merchants. If the surface shows widespread crumbling, loss of aggregate, or extensive cracking across more than a third of the area, professional resurfacing is likely more cost-effective.
How do I stop weeds coming back in driveway joints after spring cleaning?
After clearing weeds, apply a path and drive weedkiller to the joints and allow it to dry fully. For block paving, brush in kiln-dried jointing sand or a polymeric jointing compound — this sets firm, significantly reducing the gaps where weed seeds can germinate.
Does pressure washing damage a tarmac or block-paved driveway?
A pressure washer is safe on most surfaces if used correctly: keep the lance moving, use a wide fan nozzle rather than a pencil jet, and stay at least 20–30 cm from the surface. On block paving, avoid directing the jet directly into joints as it will remove the bedding sand.
Do I need planning permission to repair or resurface my driveway?
Repair work — filling cracks, repointing, or like-for-like resurfacing — does not require planning permission. However, if you are laying a new impermeable surface larger than 5 square metres on the front of a property, permitted development rules require it to drain to a permeable area or have its own drainage. See gov.uk for the current guidance.
Before applying any tarmac or concrete filler, prime the repair area with a thin coat of the same material diluted or brushed in dry — this keys the surface and significantly improves bond strength on older, oxidised driveways. Cold-lay tarmac applied straight onto a porous, unprimed surface often lifts under tyre stress within one winter.
Sources
- HSE — Slips and trips: guidance on surfaces (external areas) — hse.gov.uk
- gov.uk — Paving your front garden (permitted development and drainage rules) — gov.uk
- Which? — Driveway costs and types guide — which.co.uk
This guide is for general information only. Always work safely and follow manufacturer instructions. DIYnut accepts no liability for injury or damage arising from DIY work.


