How to Reseal a Shower Tray – DIY Guide
To reseal a shower tray, remove all old silicone with a sealant remover tool, clean the joint thoroughly, allow it to dry completely, then apply a fresh bead of sanitary silicone sealant and smooth it with a wetted finger or sealant tool. Allow 24 hours to cure before use.


- Sealant removal tool or Stanley knife
- Craft knife
- Sealant gun
- Smoothing tool or wetted finger
- Masking tape
- Cloth or paper towels
- Spray bottle
- Sanitary silicone sealant (mould-resistant)
- Sealant remover solution
- Isopropyl alcohol or white spirit
- Masking tape
- Dry cloth
- Cotton wool or cotton buds
Step-by-Step Guide
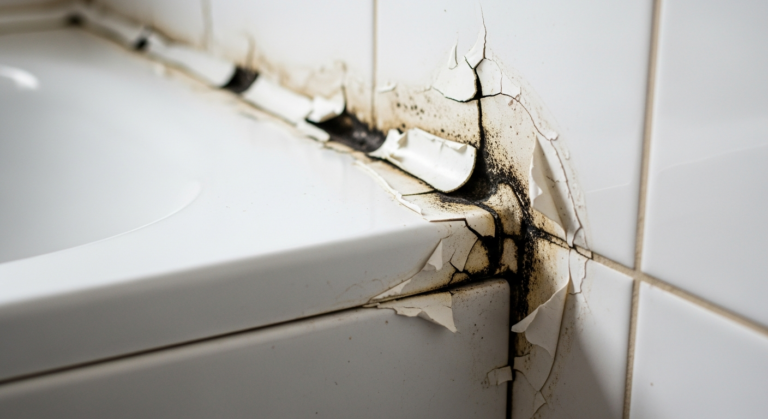
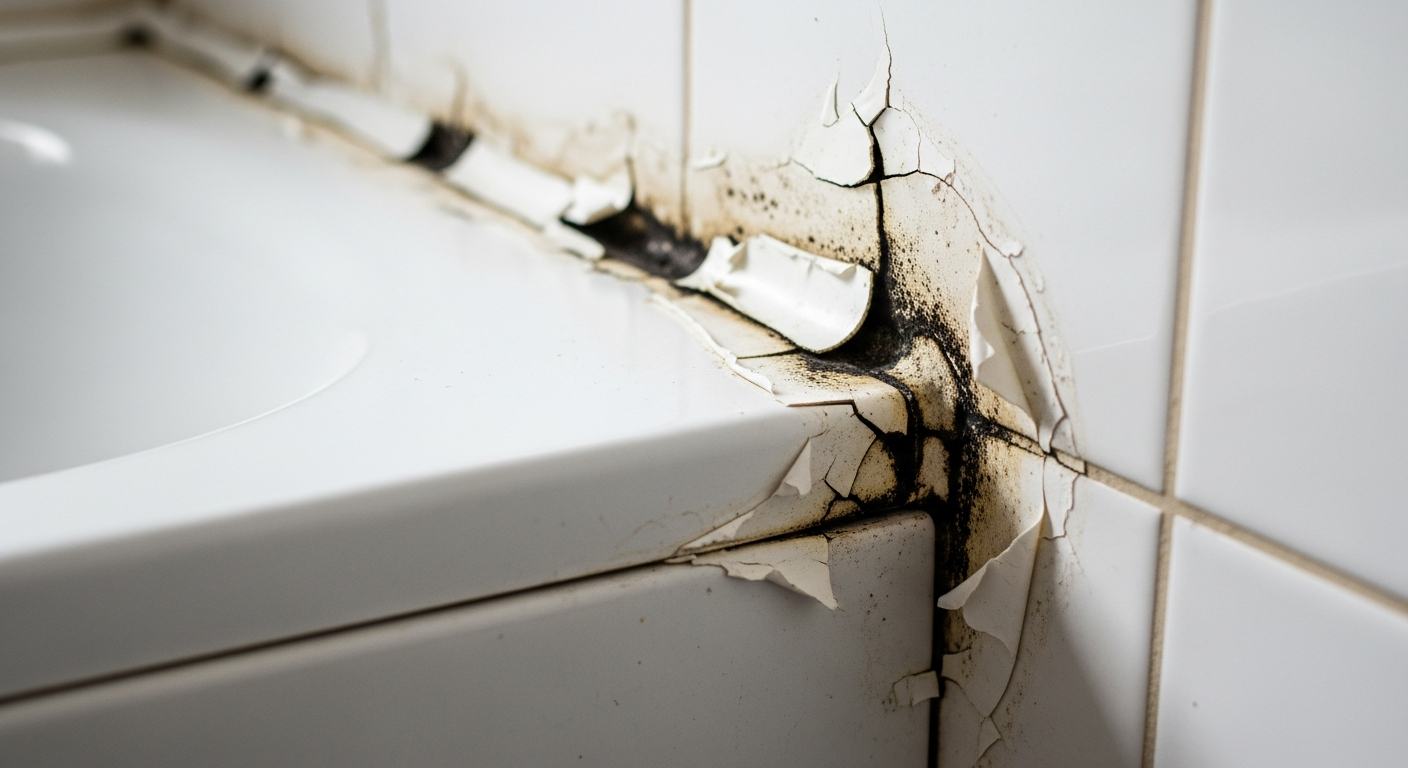
Remove all existing silicone
Score along both edges of the old sealant bead with a craft knife to free it from the tray and wall surfaces. Use a sealant removal tool or Stanley knife to lift and peel away as much of the old silicone as possible in long strips. Apply a proprietary sealant remover solution to any remaining residue and leave it to soften for the time stated on the product — typically 30 to 60 minutes — then scrape clean. If you’re also dealing with a persistent leak rather than just failed sealant, see our guide on how to fix a leaking shower tray for a more thorough diagnosis.
Clean and degrease the joint
Any grease, soap residue, or old sealant left on the surface will prevent the new silicone from bonding properly. Wipe the joint area down with isopropyl alcohol or white spirit on a clean cloth, working along the full length of both the tray edge and the wall surface. Allow the surfaces to dry completely — silicone applied to damp or contaminated surfaces will lift and fail within weeks. This is the single most important step in the whole job.
Allow surfaces to dry thoroughly
Give the joint at least one hour to air-dry after cleaning — longer in a poorly ventilated bathroom. Silicone will not cure correctly if applied to a wet surface, and any moisture trapped beneath the bead will cause it to peel away from the inside. Open a window or run an extractor fan to speed up drying. Poor bathroom ventilation is a common cause of repeat sealant failure; if this is an ongoing problem in your bathroom, read our bathroom ventilation guide for practical fixes.
Apply masking tape and load the sealant gun
Run two strips of masking tape parallel to the joint — one on the tray surface and one on the wall — leaving a gap of 4–6 mm between them. This creates clean, straight edges and prevents silicone smearing onto surrounding surfaces. Cut the nozzle of the sanitary silicone cartridge at a 45-degree angle to match the joint width, then load it into the sealant gun. Use a sanitary-grade, mould-resistant silicone formulated for wet areas; standard decorator’s silicone will not withstand constant water exposure.
Apply and smooth the silicone bead
Hold the gun at a consistent 45-degree angle and apply a steady, continuous bead of silicone along the joint in one smooth pass — do not stop and restart, as this creates weak spots. Immediately smooth the bead with a wetted finger or a plastic smoothing tool, pressing it firmly into the joint to ensure full contact with both surfaces. Remove the masking tape while the silicone is still wet, pulling it away at a 45-degree angle to leave a crisp, clean edge. Wipe away any excess with a damp cloth before it skins over. For comparison with a similar job, our step-by-step guide on how to re-silicone a bath covers the same technique in detail.
Allow to cure fully before use
Leave the silicone to cure for a minimum of 24 hours — and ideally 48 hours — before running water over it. Check the product data sheet, as cure times vary between products and ambient temperatures. Do not use the shower, apply any cleaning products, or allow water near the joint during this period. Once cured, run the shower briefly and check for any sign of water tracking behind the bead at the corners — these are the most common points of failure and may need a small additional pass of silicone to fill any gaps.
Frequently Asked Questions
How long does resealing a shower tray take?
The active work — removing old sealant, cleaning, and applying the new bead — takes around 1 to 2 hours. You then need to allow 24 to 48 hours for the silicone to cure fully before using the shower.
How do I know if my shower tray seal has failed?
The most obvious signs are visible cracks or gaps in the sealant bead, black mould growing on or behind the silicone, or water appearing on the floor outside the shower tray after use. Any of these means the seal needs replacing.
Can I apply new silicone over old silicone?
No — this is the most common reason resealing fails. New silicone will not bond to old silicone reliably, and the bead will lift. You must remove all traces of the old sealant before applying a fresh bead. For related techniques, see our guide on how to regrout wall tiles, which uses a similar preparation process.
What type of silicone should I use for a shower tray?
Use a sanitary-grade, mould-resistant silicone sealant rated for permanent water immersion. Avoid general-purpose or frame sealants — they are not designed for the wet, humid conditions in a shower enclosure and will degrade quickly.
How often should a shower tray be resealed?
A well-applied sanitary silicone bead in a properly ventilated bathroom should last 3 to 5 years. If you’re resealing more frequently than that, the underlying cause is likely poor bathroom ventilation or persistent mould — both of which degrade silicone from the outside in.
Before applying the new bead, step into the shower tray and stand in it for 30 seconds to compress it under your body weight — keep your weight on it while you apply the silicone. This replicates the deflection that occurs during use, so the cured bead won’t be put under tension every time someone stands in the tray, which is the primary reason seals crack and lift prematurely.
Sources
- HSE — Water and Sanitation: Guidance for Facilities — hse.gov.uk
- Which? — How to regrout and reseal a bathroom — which.co.uk
- WaterSafe — Find an approved plumber — watersafe.org.uk
Safety Notice: Electrical and plumbing work can be dangerous if done incorrectly. In the UK, certain electrical work must comply with Part P of the Building Regulations and certain plumbing work with Part G. If in doubt, consult a qualified electrician (NICEIC/NAPIT registered) or plumber (CIPHE/WaterSafe registered). This guide is for general information only — it is not a substitute for professional advice.