How to Repair Broken Fence – 2026 Guide
How to Repair a Broken Fence
Fix broken fence panels and posts yourself and save on contractor costs.
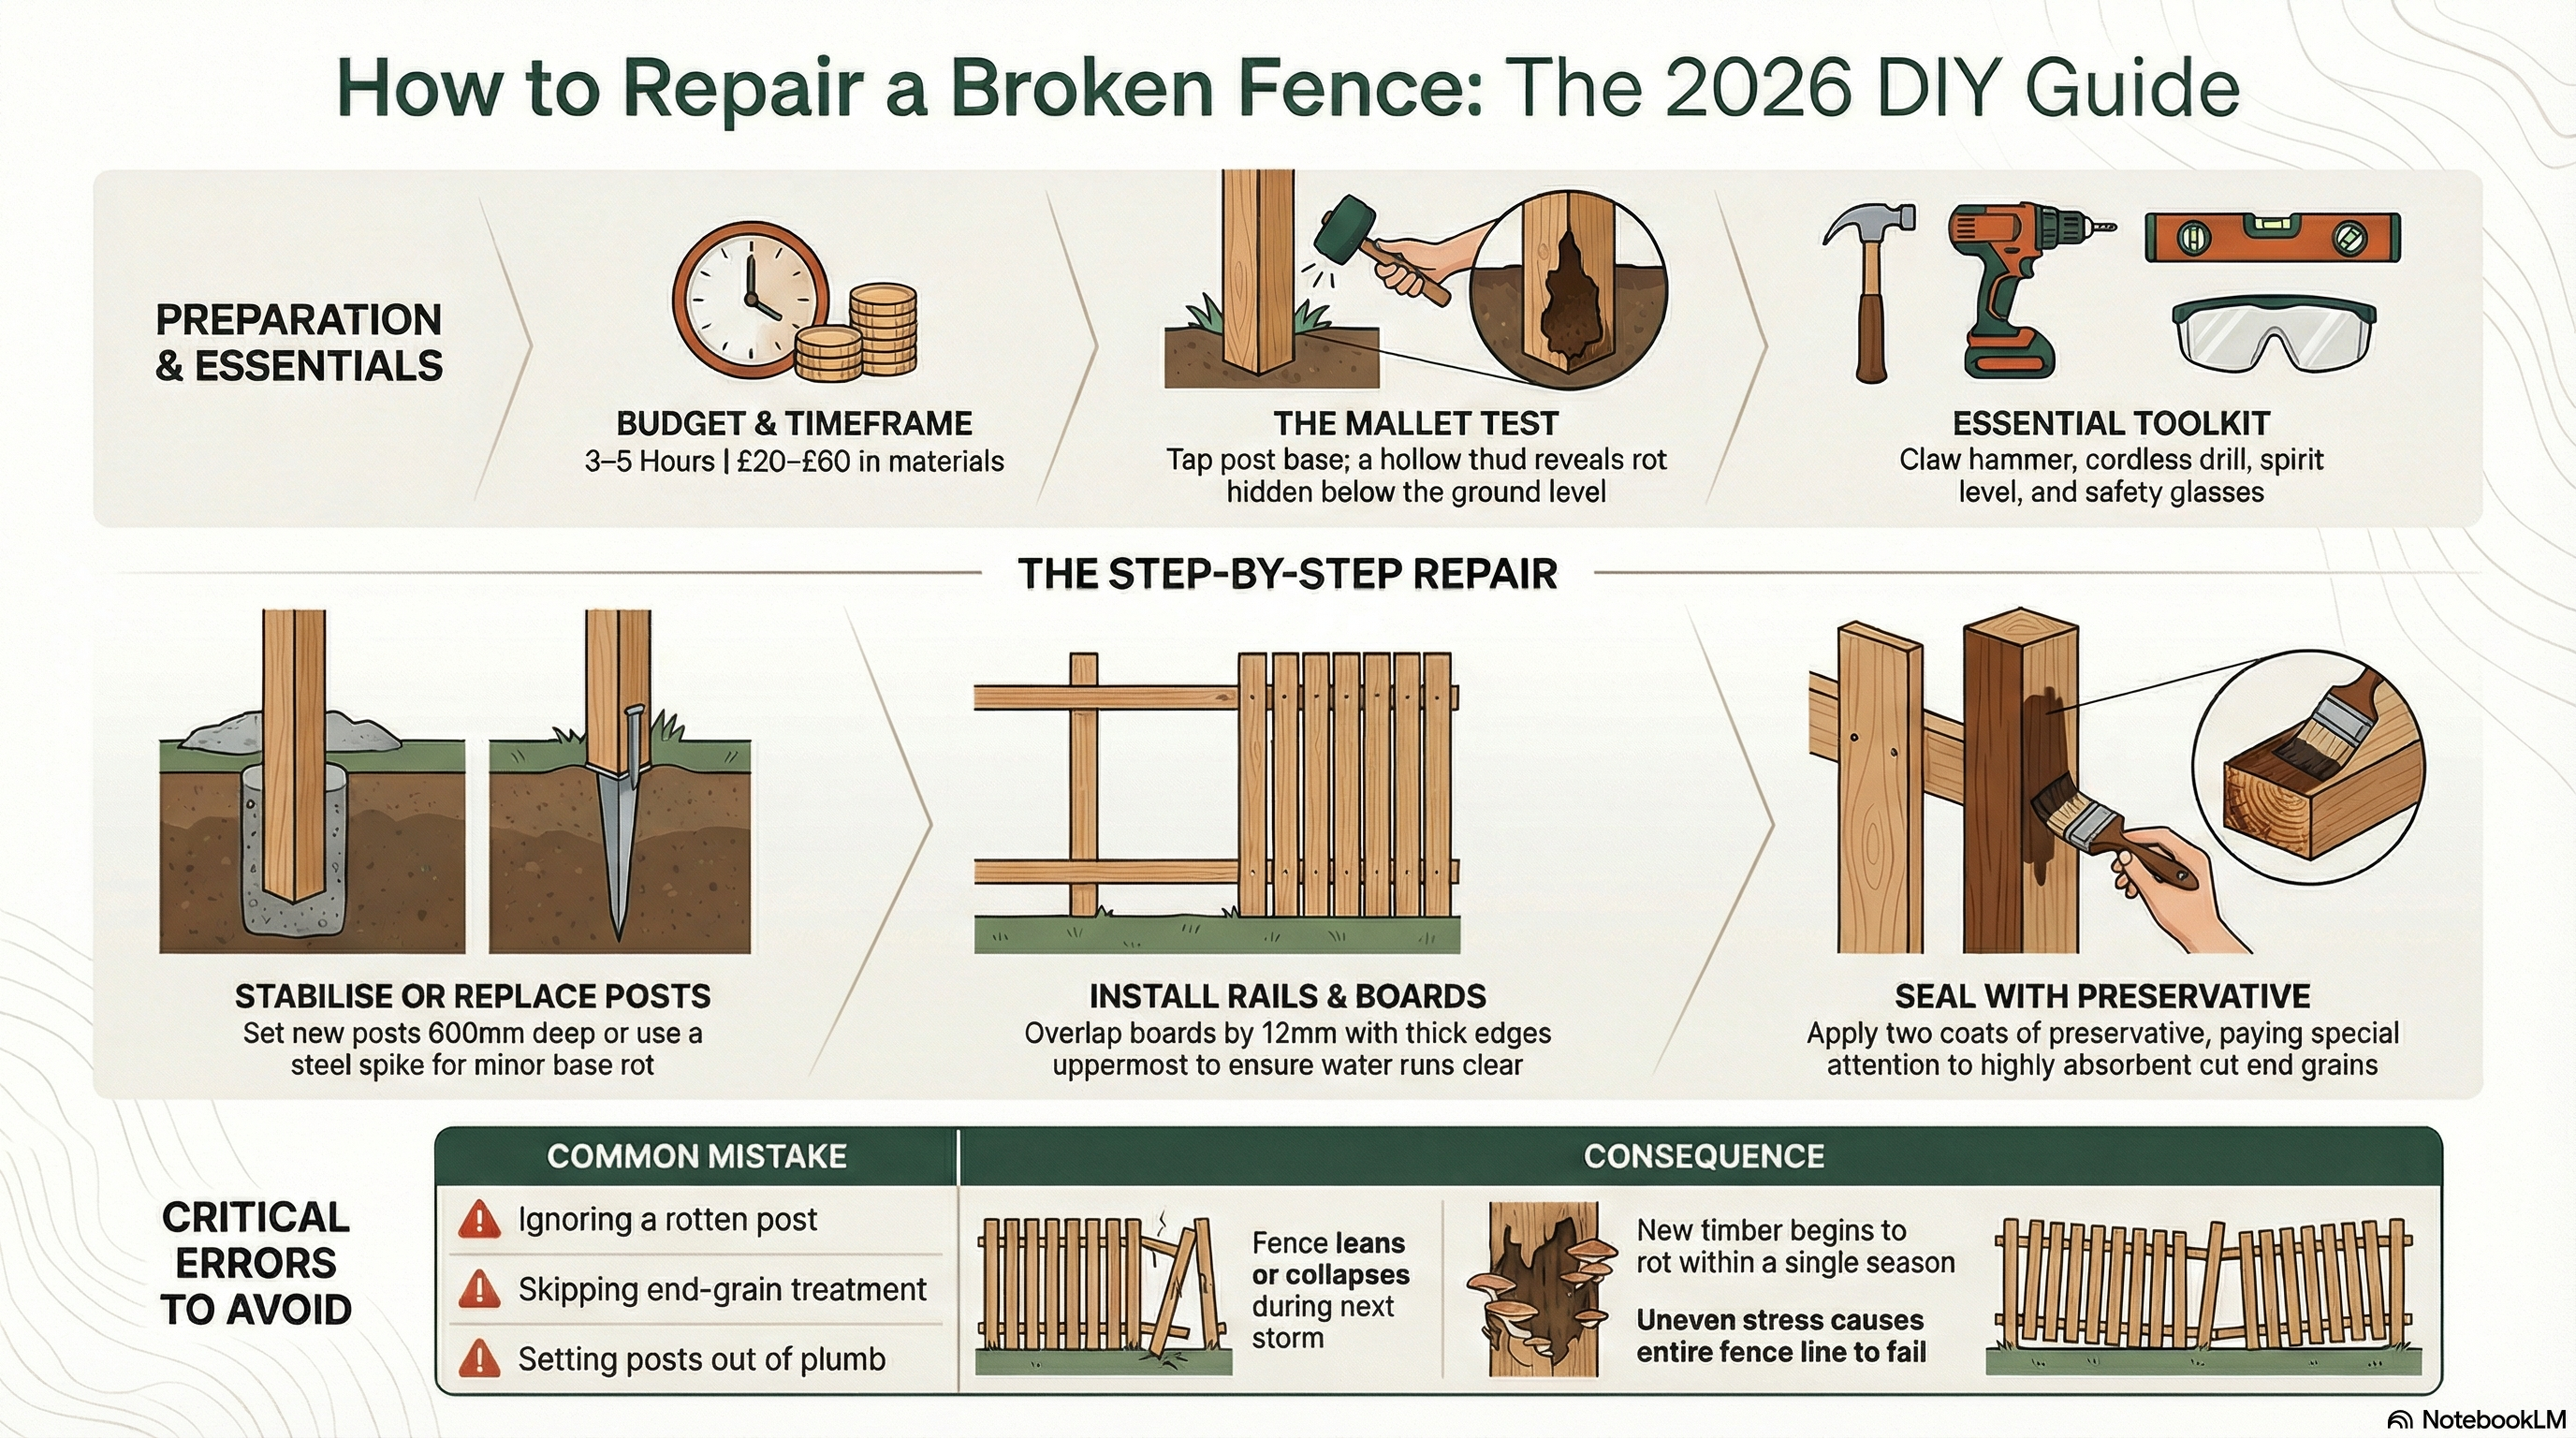
To repair a broken fence, identify whether the post or panel is damaged, dig out or brace any leaning post, replace snapped rails or panels, and treat all new timber with preservative. Most repairs take half a day and cost under £60 in materials.
- Claw hammer
- Cordless drill and screwdriver bits
- Post hole digger or spade
- Saw (hand saw or circular saw)
- Spirit level
- Tape measure
- Mallet
- Safety glasses
- Replacement fence panel or feather-edge boards
- Replacement fence post (if required)
- Fence post repair spike or post mix concrete
- Galvanised fence post brackets
- Galvanised screws or nails (75 mm)
- Timber preservative (clear or brown)
- Gravel board (treated timber or concrete)
- Wooden fence rails (if replacing)
Step-by-Step Guide
Assess the damage before buying materials
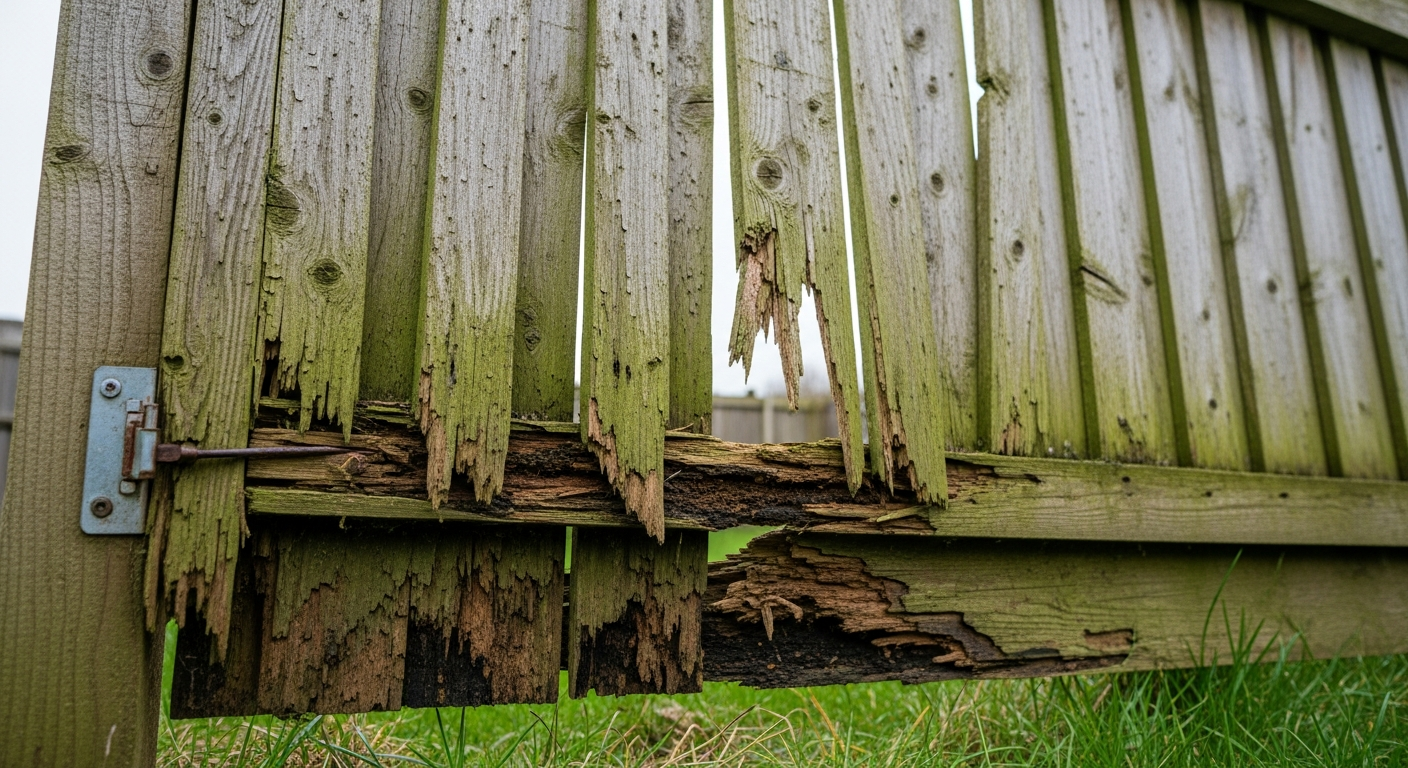
Walk the fence line and identify exactly what has failed — a rotten post, a snapped arris rail, individual boards, or a whole panel. Tapping the post base with a mallet will reveal hidden rot; a hollow thud means the post is rotten below ground. Knowing what needs replacing prevents a wasted trip to the merchant.
Support or remove the damaged section safely
Prop any leaning panels with timber offcuts so they do not fall and injure someone while you work. If a post needs replacing, carefully unscrew or lever off the attached panels first and lean them against a solid surface. Never work beneath an unsupported fence panel or leave a gap unattended if you have children or pets.
Replace or stabilise the fence post
If only the base is rotten, cut away the rotten section and fit a steel post repair spike over the stump, driving it firm with a mallet and checking vertical with a spirit level. If the post has failed entirely, dig out the old concrete and set a new post at least 600 mm into the ground — one third of the post’s total length — and backfill with post mix concrete, again checking plumb on two faces. Allow concrete to cure for 24 hours before loading the post with panels.
Repair or replace the arris rails and boards
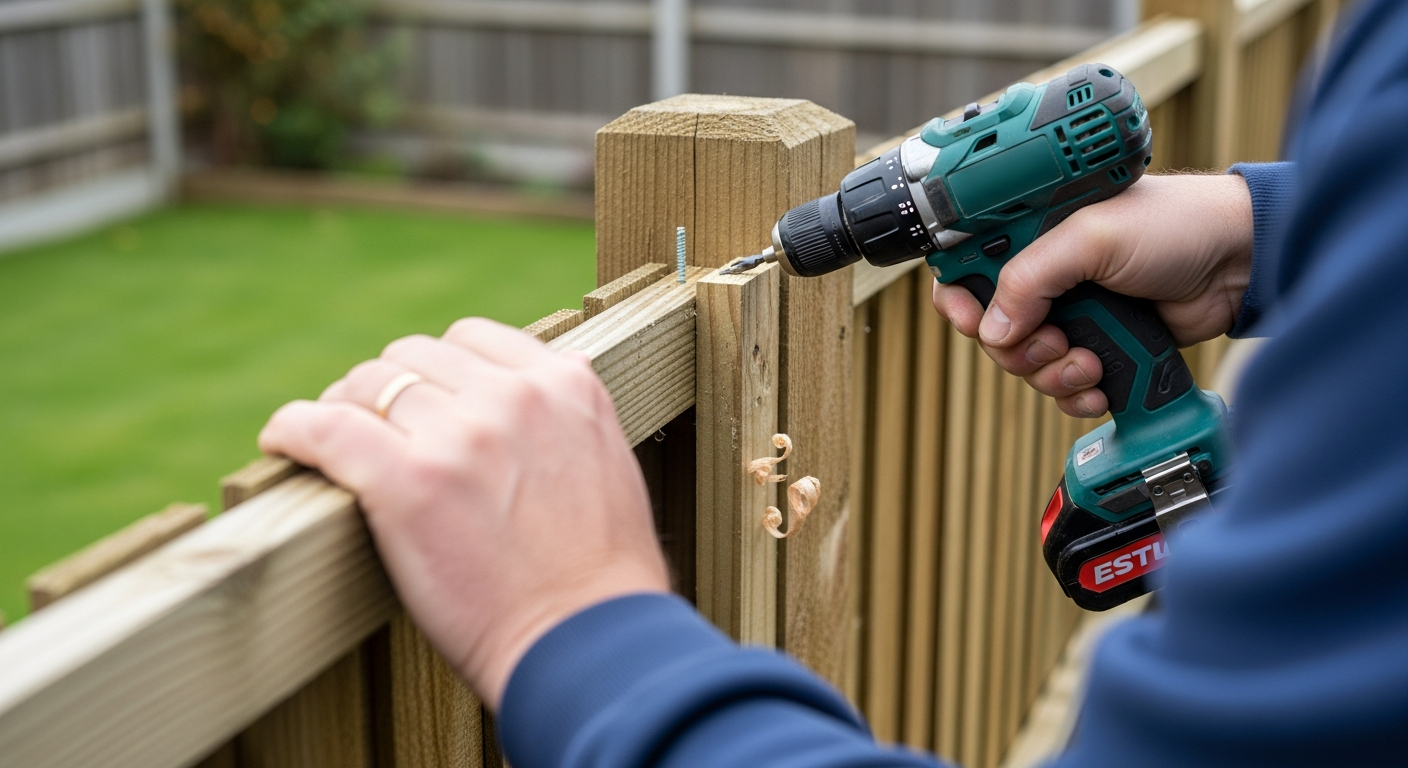
Snap a new arris rail into galvanised rail brackets screwed to the posts, or splice a short section using a rail repair bracket if only the centre has snapped. Refit or replace individual feather-edge boards by nailing or screwing them to the rails, overlapping each board by approximately 12 mm, and keeping the thick edge of each board uppermost so water runs clear. Work from one post towards the other, checking alignment with a taut string line as you go.
Fit a gravel board at the base
If the existing gravel board is rotten or missing, fit a replacement timber or concrete gravel board between the posts before refitting the panels. A gravel board keeps the panel timber clear of damp soil, which is the primary cause of premature fence rot. Secure timber gravel boards with galvanised screws into the posts.
Apply timber preservative to all new and cut timber
Brush a generous coat of timber preservative onto all new rails, boards, and any cut ends — paying particular attention to end grain, which absorbs moisture fastest. Allow the first coat to soak in for 30 minutes, then apply a second coat. This step significantly extends the life of your repair and prevents the same failure recurring within a few years.
Frequently Asked Questions
Who is responsible for repairing a fence — me or my neighbour?
Responsibility depends on your property deeds, which should show a ‘T’ mark on the boundary indicating ownership. If the T is on your side, the fence is yours to maintain. If there is no clear indication, the matter defaults to a neighbourly agreement — there is no automatic legal rule that the left or right boundary belongs to a specific party.
Can I repair a fence panel without replacing the whole post?
Yes, if the post is sound you can replace just the panel or individual boards. Unscrew or prise off the damaged panel, slide the new one into the post slots or screw it to galvanised brackets, and refit the gravel board.
How long does post mix concrete take to set before I can fit panels?
Most post mix concrete products are workable within 10 minutes and reach sufficient strength to load after 24 hours. Avoid fitting panels or applying any lateral load until the full cure time has elapsed, especially in cold or wet weather when curing slows.
What is the best wood preservative for fence repairs?
Use a solvent-based or water-based exterior timber preservative rated for ground contact on any section near the soil. Apply at least two coats to all surfaces, and always treat cut ends with an end-grain preservative or an extra application of the same product.
Do I need planning permission to repair my fence?
Repairing an existing fence like-for-like does not require planning permission. However, if you are increasing the height of a fence adjacent to a highway to above 1 metre, or any other fence above 2 metres, you will need to check with your local planning authority. Guidance is available on the Planning Portal at gov.uk.
When you drive a repair spike into an old post stump, pour a small amount of timber preservative into the hole before fitting the spike — it seals the cut end inside the spike collar where a brush cannot reach. This prevents moisture wicking up through the trapped stump and rotting the new structure from the inside out.
Sources
- HSE — Safe use of hand tools and working outdoors safely — hse.gov.uk
- Planning Portal — Do I need planning permission? Fences, gates and garden walls — planningportal.co.uk
- Which? — How to repair a fence — which.co.uk
This guide is for general information only. Always work safely and follow manufacturer instructions. DIYnut accepts no liability for injury or damage arising from DIY work.
How to Repair a Broken Fence – Visual Guide