Shelving & Storage: Complete UK DIY Guide 2026
DIY Guides › Shelving & Storage
Shelving & Storage
Floating shelves, alcove units, wardrobe rails and fitted storage — practical guides for UK homes.
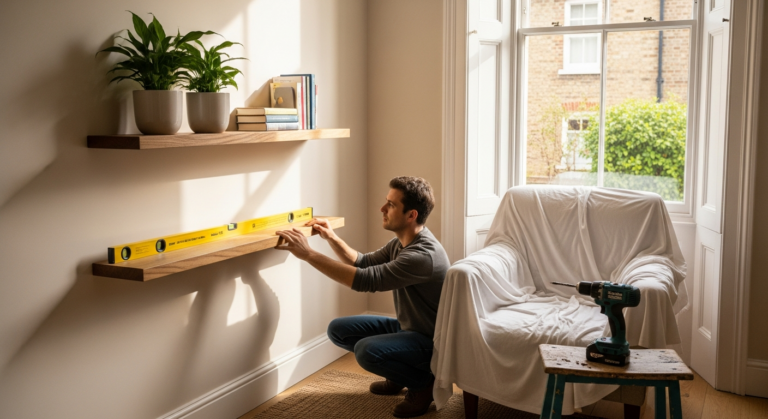
Wall-fixed shelving is only as strong as its fixing. Identify the wall type first — solid masonry, timber stud, or metal stud — and use the correct wall plug and fixing for the load. Always fix into studs where possible. Use a spirit level for every shelf — the eye is drawn immediately to anything out of level.
- Stud finder (electronic)
- Spirit level
- Drill/driver
- Masonry bit (for solid walls)
- Tape measure and pencil
- Screwdriver
- Wall plug insertion tool
- Timber or plywood shelf board (18–25mm)
- Shelf brackets (heavy-duty for loads over 10kg)
- Wall plugs (correct type for wall construction)
- Screws (appropriate gauge and length)
- Sandpaper (120 and 180 grit)
- Paint, stain, or varnish for the shelf
The Process Overview
Identify Wall Type and Locate Fixings
Tap the wall — a hollow sound indicates a stud partition; a solid sound indicates masonry. Use an electronic stud finder to locate timber or metal studs in stud walls. Mark stud positions in pencil. For solid walls, fixings can go anywhere with the correct masonry wall plug. For stud walls, fixing into studs is essential for any load-bearing shelf.
Mark Level Bracket Positions
Use a spirit level to mark a horizontal line at the shelf height. Mark bracket positions along this line at equal spacing — maximum 400mm from each end and no more than 500mm between brackets for shelves carrying books or heavy objects. Drill a single fixing hole for each bracket before screwing — do not fully commit until all brackets are in alignment.
Drill and Fit Wall Plugs
Select a masonry bit diameter matched to the wall plug size. Drill to the correct depth (plug length plus 5mm) and blow dust from the hole. Insert the wall plug flush with the wall surface — tapping gently with a hammer if required. For solid walls, use a hammer drill on brick or block; use a standard drill on plasterboard with the correct toggle or cavity anchor.
Fix Brackets and Check Level
Screw each bracket to the wall, leaving one screw slightly loose for adjustment. Place a spirit level across all bracket tops and adjust until perfectly level, then tighten all fixings fully. For floating shelf systems (using a hidden batten), fix the batten to the wall first and check it is level along its full length before attaching the shelf.
Cut and Prepare the Shelf
Cut the shelf board to length — use a hand saw with a guide or a circular saw with a batten clamped as a fence. Sand all cut edges flush with the face. Prime and paint or apply stain and varnish before fitting — much easier to finish the shelf on a bench than mounted on the wall.
Fix the Shelf and Load Test
Locate the shelf onto the brackets and fix with screws through the bracket into the underside of the shelf. For floating shelves, slide the shelf onto the wall batten and fix from underneath or through a pre-drilled face hole. Test the shelf by applying the intended load and check for any movement or deflection before loading permanently.
Frequently Asked Questions
How do I find studs in a stud wall?
Use an electronic stud finder — run it horizontally across the wall, and it beeps or lights when it detects the stud behind the plasterboard. Alternatively, tap the wall — a solid sound indicates a stud, hollow indicates a cavity. Studs are typically at 400mm or 600mm centres. Drive a thin finishing nail at your suspected stud location to confirm before drilling the fixing hole.
What wall plug do I use for solid walls?
For brickwork and concrete blockwork, use a red plastic wall plug (6mm) for M4–M5 screws, or a brown plug (7mm) for M5–M6 screws. These are universal for most shelf bracket and batten fixings. For engineering brick or very dense stone, use a hammer drill and ensure the plug seats fully without spinning in the hole.
How much weight can a floating shelf hold?
A floating shelf fixed correctly into two timber studs with 80mm screws can hold 15–25kg depending on the shelf depth and bracket design. The same shelf fixed into plasterboard with cavity anchors holds 5–10kg maximum. The wood species and thickness of the shelf affects deflection — 18mm MDF or softwood is sufficient up to 30cm spans; anything wider or heavier needs 25mm or solid hardwood.
How do I build alcove shelving?
Fit a 50x25mm softwood batten to the back wall and each side wall at shelf height, fixing into the plaster and masonry behind. The shelf sits on these battens. For a clean look, cut the shelf so it slides snugly between the side battens and fix it down with a screw from above into each side batten. Paint battens and shelf the same colour as the walls for a built-in effect.
Can I cut a shelf board to fit an awkward alcove shape?
Yes — use a compass or offcut as a scribe tool to mark the wall profile onto the shelf end, then cut with a jigsaw. Alcoves are rarely perfectly square or plumb, so scribing to fit is the professional approach. Test-fit the shelf dry before sanding or finishing the edges.
Fix your top shelf first, then work downwards — this way you can always reach the upper fixings without the lower shelves in the way. When marking bracket positions, hold the bracket against the wall and use it as a drilling template rather than measuring separately — this eliminates the small spacing errors that accumulate across a run of shelves.
Sources
- Rawlplug — fixing selector and load ratings for all wall types — rawlplug.co.uk
- HSE — manual handling and safe working at height guidance — hse.gov.uk
- Timber Research and Development Association — structural timber guidance — trada.co.uk
This guide is for general information only. Always work safely and follow manufacturer instructions. DIYnut accepts no liability for injury or damage arising from DIY work.
Step-by-Step Guides
Step-by-step guides for this category are being published now. Check back soon — or use the app to get an instant plan for your specific job.