Smart Home DIY Guides for UK Homes 2026: Thermostats, Lighting, Doorbells & More
Smart Home
Everything you need to plan, choose, and install DIY-friendly smart home devices across a UK 230V household — no electrician required.
Most smart home devices sold in the UK are designed for straightforward DIY installation — smart thermostats, plugs, bulbs, and video doorbells can all be fitted without touching fixed wiring, keeping you safely outside Part P regulations. The key is choosing devices that connect to existing terminals or standard sockets rather than requiring new circuits or consumer unit work. Start with a single ecosystem (Google Home, Amazon Alexa, or Apple HomeKit) and build outward, otherwise you’ll end up with a house full of apps that won’t talk to each other.

- Crosshead (Phillips) screwdriver — PH1 and PH2 sizes
- Flat-head screwdriver for terminal screws
- Voltage tester or non-contact live wire detector
- Smartphone with Bluetooth and Wi-Fi for app pairing
- Spirit level (for mounting video doorbells and smart switches)
- Cordless drill with masonry and wood bits
- Wall plugs and appropriate screws for your wall type
- Pencil and tape measure for marking bracket positions
- Smart thermostat system (e.g., Hive, Nest, Tado) with receiver and wall plate
- Smart bulbs or smart light switches compatible with your chosen ecosystem
- Video doorbell with mounting bracket and supplied fixings
- Smart plugs rated for UK 230V/13A BS 1363 sockets
- AA or AAA batteries for wireless sensors and remotes
- Electrical insulating tape and cable clips for any exposed low-voltage wiring dressing
The Process Overview
Step 1 — Choose Your Ecosystem First
Before buying a single device, decide whether your household will centre around Amazon Alexa, Google Home, or Apple HomeKit — or a hub-based system like Samsung SmartThings. This decision drives every purchase that follows, because mixing ecosystems creates fragmented control and unreliable automation. Check which voice assistant you already use on your phone and build from there.
Step 2 — Audit Your Wi-Fi Coverage and Router Position
Smart home devices are only as reliable as your Wi-Fi, so walk every room with your phone’s Wi-Fi signal indicator before ordering anything. Devices in hallways, porches, and outbuildings are common weak spots — particularly video doorbells. If coverage is patchy, invest in a mesh Wi-Fi system like BT Whole Home or Eero before installing smart devices, or you’ll spend hours troubleshooting dropouts.
Step 3 — Install Smart Plugs and Bulbs as Your Starting Point
Smart plugs (BS 1363 plug-in adaptors) and smart bulbs require zero electrical knowledge and zero tools — they are genuinely plug-and-play starting points for any beginner. Use them to automate lamps, fans, and appliances while you learn the app and automation logic of your chosen ecosystem. Once comfortable, you can move on to more involved installs like thermostats and doorbells.
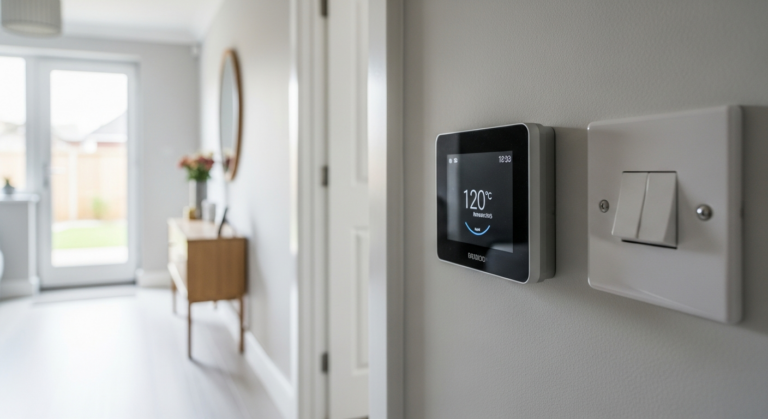
Step 4 — Fit a Smart Thermostat
Turn off the boiler and isolate power at the consumer unit before touching any thermostat wiring — even though thermostat circuits run at low voltage (typically 24V or mains-derived via a transformer), the receiver unit wired to your boiler may be at mains potential. Follow the manufacturer’s wiring diagram exactly, photograph your existing wiring before disconnecting anything, and use a non-contact tester to confirm the circuit is dead. Most UK systems (Hive, Nest, Tado) provide clear wire-labelling guides and customer support lines specifically for DIY installation.
Step 5 — Install a Video Doorbell
Wired video doorbells connect to your existing doorbell transformer (typically 8–24V AC), which is low-voltage and outside the scope of Part P — making them legal for DIY fitting. Battery-powered models are even simpler, requiring only a drill and wall plugs for the mounting bracket. Position the camera at 1.0–1.2 metres height for optimal face-level detection, and angle the bracket if your door is set back from the button position.
Step 6 — Set Up Automations and Test the System
Hardware installation is only half the job — the value of a smart home comes from automations: lights that turn on at sunset, heating that drops when you leave, doorbells that trigger indoor chimes and phone alerts simultaneously. Spend time in your ecosystem’s app building routines, then test every device through a full daily cycle before considering the job done. Update all device firmware on day one and enable two-factor authentication on your smart home account to protect your network.
Frequently Asked Questions
Do I need an electrician to install smart home devices in the UK?
For the vast majority of consumer smart home products — smart plugs, smart bulbs, video doorbells (battery or existing doorbell transformer), and smart thermostats — no electrician is required. These devices either plug into existing sockets or connect to low-voltage circuits and are explicitly designed for homeowner installation. Part P of the Building Regulations only applies to fixed mains electrical work such as adding new circuits, moving sockets, or replacing consumer units. If a smart device requires you to install new wiring from the consumer unit, you should engage a Part P registered electrician or notify your local building control authority.
Will a smart thermostat work with my UK combi boiler?
Yes — most UK smart thermostat systems including Hive, Nest, and Tado are specifically designed for combi boilers, which are the dominant boiler type in British homes. Combi boilers require only the room thermostat connection (typically a two-wire switched live circuit) and do not need a separate hot water cylinder control. Before purchasing, use the compatibility checker on the manufacturer’s website — Nest and Tado both have excellent online tools where you input your current wiring configuration and they confirm compatibility. If you have a heat-only or system boiler with a separate hot water cylinder, you will need a multi-zone kit which costs more but is still DIY-installable.
Is it safe to use smart plugs with high-wattage appliances like electric heaters?
UK smart plugs rated to 13A (approximately 3,000W at 230V) are safe for most household appliances including electric heaters up to 3kW. Always check the wattage rating printed on the smart plug against the appliance’s power consumption, which is shown on the appliance’s rating plate. Never daisy-chain smart plugs or use them with extension leads running near their rated capacity — this is a fire risk regardless of whether the plug is smart or standard. For high-draw appliances like 3kW fan heaters, choose smart plugs from reputable brands with UK CE/UKCA markings and a 13A BS 1363 rating.
What is the Matter standard and should I wait for it before buying smart home devices?
Matter is an open smart home connectivity standard backed by Apple, Google, Amazon, and Samsung that allows devices from different manufacturers to work together natively — addressing the ecosystem fragmentation problem directly. As of 2025–2026 an increasing number of UK-sold smart home devices carry Matter certification, meaning they can be controlled simultaneously from multiple ecosystems without manufacturer workarounds. If you are starting a smart home from scratch in 2026, prioritising Matter-compatible devices is sensible future-proofing. However, established ecosystems like Hive, Tado, and Philips Hue already work reliably within their own platforms, so you do not need to wait — just check for the Matter logo on new purchases.
Can I install a smart doorbell if I don’t have an existing wired doorbell?
Absolutely — battery-powered video doorbells such as the Ring Video Doorbell (battery), Eufy Video Doorbell, and Arlo Essential require no existing wiring whatsoever. You simply fix the mounting bracket to the wall or door frame using the supplied screws (a 5-minute job with a drill), attach the doorbell, connect it to your Wi-Fi via the app, and you’re done. Battery life typically ranges from one to six months depending on motion sensitivity settings and visitor frequency, and most models charge via USB-C or a proprietary cable without needing to remove the entire unit. If you do have an existing wired doorbell, a wired video doorbell is preferable as it eliminates battery management entirely.
After sixteen years working in and around UK homes, the single piece of advice I give everyone starting a smart home is this: treat your router as seriously as you treat your consumer unit. I’ve seen beautifully specified smart home setups rendered completely useless by a cheap ISP-supplied router shoved in a cupboard under the stairs. Invest in a mesh Wi-Fi system — BT Whole Home, Amazon Eero, or TP-Link Deco are all solid UK-available options — before you spend a penny on smart devices. Run your mesh nodes through the house first, confirm you have a strong signal at the boiler location, the front door, and every bedroom, then start buying hardware. You’ll spend less time on the phone to manufacturer support lines and more time actually enjoying the automation. Also: always photograph your existing thermostat wiring before disconnecting anything. I cannot tell you how many calls I’ve fielded from people who unwired their Honeywell thermostat confident they’d remember which wire went where, and didn’t.
Sources
- UK Government guidance on Part P of the Building Regulations covering electrical safety in dwellings — clarifies what DIY electrical work is and is not notifiable, essential reading before any smart home installation involving mains wiring — gov.uk
- Which? independent consumer testing and reviews of UK smart home devices including smart thermostats, video doorbells, and smart speakers — includes ecosystem compatibility guidance and value-for-money assessments — which.co.uk
- Health and Safety Executive guidance on electrical safety for homeowners and the risks of DIY electrical work — reinforces safe working practices around domestic wiring — hse.gov.uk
This guide is for general information only. Always work safely and follow manufacturer instructions. DIYnut accepts no liability for injury or damage arising from DIY work.