How to Lay Laminate Flooring – 2026 Guide
How to Lay Laminate Flooring
Transform any room with a durable, great-looking floor you can fit yourself in a day.
To lay laminate flooring, acclimatise the boards for 48 hours, fit a foam underlay, then click the planks together row by row leaving a 10mm expansion gap at all edges. Trim the final row to fit and refit skirting boards or add beading to cover the gap.


- Tape measure
- Pencil
- Pull bar
- Tapping block
- Hammer
- Jigsaw or hand saw
- Spacers
- Utility knife
- Laminate flooring boards
- Foam underlay
- Vapour barrier (if over concrete)
- Expansion gap spacers
- Laminate flooring adhesive (for door frames)
- Threshold strips
- Skirting board beading or new skirting board
- Finishing nails or adhesive for beading
Step-by-Step Guide
Acclimatise the boards
Stack the unopened laminate packs flat in the room where they will be fitted for at least 48 hours before you start. Laminate expands and contracts with temperature and humidity, so skipping this step causes boards to buckle or gap after fitting.
Prepare the subfloor
The subfloor must be clean, dry, and level to within 3mm over 1.8 metres — check this with a long straight edge. Sand down high spots and fill dips with a floor-levelling compound ; any unevenness will cause boards to flex, creak, and eventually crack at the joints.
Lay the underlay
Roll out the foam underlay across the room, butting the edges together without overlapping and taping the joins with underlay tape. Over a concrete subfloor, lay a separate polythene vapour barrier first (or use a combined underlay-and-barrier product) to prevent moisture rising up and swelling the boards.
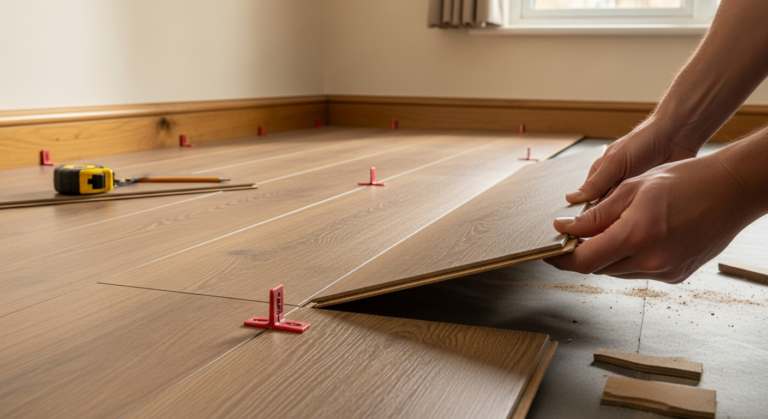
Fit the first two rows
Place 10mm spacers against the starting wall and lay the first row of boards with the tongue facing away from the wall, clicking each end joint together as you go. Stagger the end joints by at least 300mm from one row to the next for structural strength — cut the first board of alternating rows to roughly two-thirds length to start the offset.
Work across the room
Continue clicking rows together at a shallow angle, using a tapping block and hammer to close any gaps along the long edges without damaging the profile. Keep checking the expansion gap with your spacers as you go, and use a pull bar to engage boards in tight spots near walls where you cannot swing the hammer freely.
Fit the final row and finish
Measure and rip the last row of boards to width, allowing for the 10mm expansion gap, then click them into place using the pull bar. Remove all spacers, fit threshold strips at doorways, and fix skirting board beading or new skirting boards to cover the perimeter gap — secure these to the wall, never to the floor, so the laminate can still move freely.
Frequently Asked Questions
Which direction should I lay laminate flooring?
Run the boards parallel to the longest wall or the main light source for the best visual result. In a hallway, always lay boards lengthways along the run to avoid a chopped, busy appearance.
Can I lay laminate flooring over existing tiles or vinyl?
Do I need underlay if the laminate already has it attached?
No — do not double up. Using a separate foam underlay on top of pre-attached underlay makes the floor feel spongy and puts excessive stress on the locking joints, which can cause them to fail.
Can laminate flooring be laid in a bathroom or kitchen?
Standard laminate is not suitable for wet rooms and should not be used in bathrooms. Water-resistant laminate (check the manufacturer’s AC rating and warranty) can be used in kitchens, but joints must be kept dry and standing water wiped up promptly.
How do I cut around door frames and architraves?
Before you lay the first board, calculate how wide the final row will be — if it works out narrower than 50mm, cut an equal amount off the first row too so both edges are balanced and the floor looks intentional rather than like you ran out of material. This two-minute calculation at the start saves you pulling everything up at the end.
Sources
- HSE — Slips and trips: flooring guidance for employers and building owners — hse.gov.uk
- Which? — How to lay laminate flooring — which.co.uk
- GOV.UK — Building regulations: floors (Approved Document C) — gov.uk
This guide is for general information only. Always work safely and follow manufacturer instructions. DIYnut accepts no liability for injury or damage arising from DIY work.