How to Lay Hardwood Flooring – 2026 Guide
How to Lay Hardwood Flooring
Fit solid or engineered hardwood boards to any room for a lasting, professional finish.
To lay hardwood flooring, prepare your subfloor so it is flat and dry, acclimatise the boards for 48–72 hours, lay a moisture barrier and underlay, then nail, glue, or float the boards row by row, cutting the final row to fit. Finish with beading or trim.

- Tape measure
- Pencil
- Pull bar
- Tapping block
- Rubber mallet
- Mitre saw or jigsaw
- Flooring nailer or stapler
- Spacers
- Hardwood or engineered hardwood boards
- Moisture barrier / damp-proof membrane
- Flooring underlay
- Flooring adhesive
- Floor finishing nails or staples
- Beading or threshold trim
- Wood filler
- Sandpaper (medium and fine grade)
Step-by-Step Guide
Prepare and check the subfloor
The subfloor must be clean, flat, and dry before any boards go down — hardwood will not forgive an uneven base. Use a long straightedge to identify high and low spots; any deviation greater than 3 mm over 1.8 m must be corrected using a floor-levelling compound or by sanding down raised areas. Check moisture levels with a moisture meter: readings should be below 12% for timber subfloors and below 75% relative humidity for concrete slabs. Fixing squeaks now will save you pulling boards up later — our guide on how to fix a squeaky floor covers this in full before you begin.
Acclimatise the boards
Stack the hardwood boards flat in the room where they will be laid for a minimum of 48 hours, and ideally 72 hours, before installation. Hardwood is a natural material that expands and contracts with changes in temperature and humidity; skipping acclimatisation is one of the most common causes of gapping and cupping after fitting. Keep the room at its normal living temperature and humidity during this period. Leave the boards loosely stacked with spacers between rows so air can circulate around each pack.
Lay the moisture barrier and underlay
Roll out a moisture barrier across the entire subfloor, overlapping each run by at least 200 mm and taping the seams — this is essential over concrete and suspended timber floors alike. On top of the barrier, lay your chosen underlay according to the manufacturer’s instructions, cutting neatly around any doorways or obstacles. Note that solid hardwood boards being secret-nailed or glued directly to a timber subfloor do not always require a separate underlay layer; check your board manufacturer’s specification before adding one. If you are also planning to lay laminate flooring in an adjacent room, the same underlay principles apply.
Establish your starting line and lay the first rows
Snap a chalk line parallel to the longest, straightest wall, set back by the width of one board plus a 10–12 mm expansion gap — this gap is non-negotiable, as hardwood moves seasonally and needs room to breathe. Place the first board groove-side to the wall, tongue facing the room, and fix it in place using your chosen method: secret nailing through the tongue at 45°, gluing to a concrete slab, or floating with click-lock boards. Use spacers against every wall to maintain the expansion gap consistently. The first two or three rows are the most critical — get these square and the rest of the floor follows.
Work across the room row by row
Continue laying rows, engaging each board’s tongue into the previous row’s groove and tapping home with a tapping block and rubber mallet — never strike the board face directly. Stagger end joints by a minimum of 150 mm between adjacent rows to create a strong, visually balanced pattern. Cut boards to length using a mitre saw or jigsaw, measuring each piece individually rather than assuming all cuts are identical. Use a pull bar and mallet to close up the final board in each row where you cannot swing the tapping block freely. Keep checking that rows remain parallel to your starting line every four or five rows. If you notice any gaps opening between boards as you work, address them immediately before the adhesive or nails set.
Fit trim, beading, and finish the edges
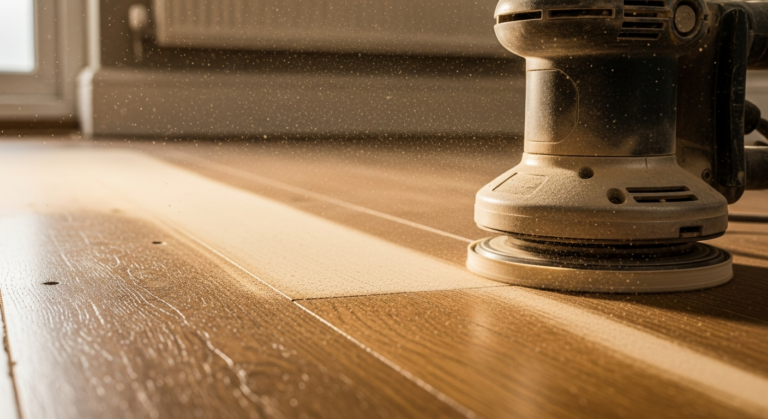
Once all boards are laid, remove the spacers and fit scotia beading or square-edge beading around the perimeter to cover the expansion gap — fix beading to the skirting board, never to the floor itself, so the floor can still move freely beneath it. Fit threshold strips at doorways and transitions to other floor types, cutting them cleanly with a mitre saw for neat joins. Fill any surface nail holes with matching wood filler, allow to dry, and sand flush. If your boards are unfinished, now is the time to sand the whole floor progressively from medium to fine grit and apply your chosen finish — oil, lacquer, or hardwax oil. You may also want to freshen up the skirting boards once the floor is complete for a clean, finished look.
Frequently Asked Questions
Can I lay hardwood flooring over underfloor heating?
Yes, but only with engineered hardwood boards specifically rated for use over underfloor heating — solid hardwood is generally not suitable as it moves too much with temperature change. Check the board manufacturer’s specification for maximum surface temperature, which is typically 27°C, and always acclimatise boards with the heating running at normal levels before fitting.
What is the difference between solid and engineered hardwood flooring?
Solid hardwood is milled from a single piece of timber and can be sanded and refinished multiple times over its lifespan, but it is more susceptible to moisture and movement. Engineered hardwood has a real wood top layer bonded to a stable plywood core, making it more dimensionally stable and suitable for a wider range of subfloor conditions including concrete and underfloor heating.
Which direction should I lay hardwood floorboards?
The standard rule is to lay boards parallel to the longest wall in the room, which draws the eye along the length of the space and makes the room feel larger. In hallways and narrow rooms, always run boards lengthways. Avoid laying boards perpendicular to natural light sources where possible, as this can highlight any slight gapping between boards.
How much extra hardwood flooring should I order?
Order 10% extra above your measured floor area to account for waste from cuts, defects in the pack, and pattern matching. If your room has an unusual shape or you are laying boards diagonally, increase the wastage allowance to 15%. It is always worth ordering slightly more than you need from the same batch to ensure a colour match if repairs are ever required later. Our complete flooring guide covers how to calculate quantities for different floor types.
Do I need planning permission to lay hardwood flooring?
No planning permission is required to lay hardwood flooring in a standard domestic property. However, if you live in a flat, check your lease first — many leases require you to maintain a specified level of acoustic insulation, and laying hard flooring without the right underlay can breach these terms and lead to disputes with neighbours below.
Before nailing your first row, dry-lay four or five rows across the full width of the room and stand back to check the visual spread of wood grain, colour variation, and end-joint positions — rearranging boards at this stage costs nothing, but ripping up a nailed floor to redistribute a run of pale boards alongside very dark ones is expensive. Trades call this ‘racking the floor’ and it is standard practice before a single fixing goes in.
Sources
- Wood Floor Association — Installation Guidelines for Wood Flooring — thewfa.co.uk
- HSE — Noise at Work: Floors and Acoustic Requirements — hse.gov.uk
- Which? — How to lay a wood floor — which.co.uk
This guide is for general information only. Always work safely and follow manufacturer instructions. DIYnut accepts no liability for injury or damage arising from DIY work.