How to Lay Slabs – 2026 Guide
How to Lay Slabs
Lay a level, long-lasting patio with the right base and bed every time.
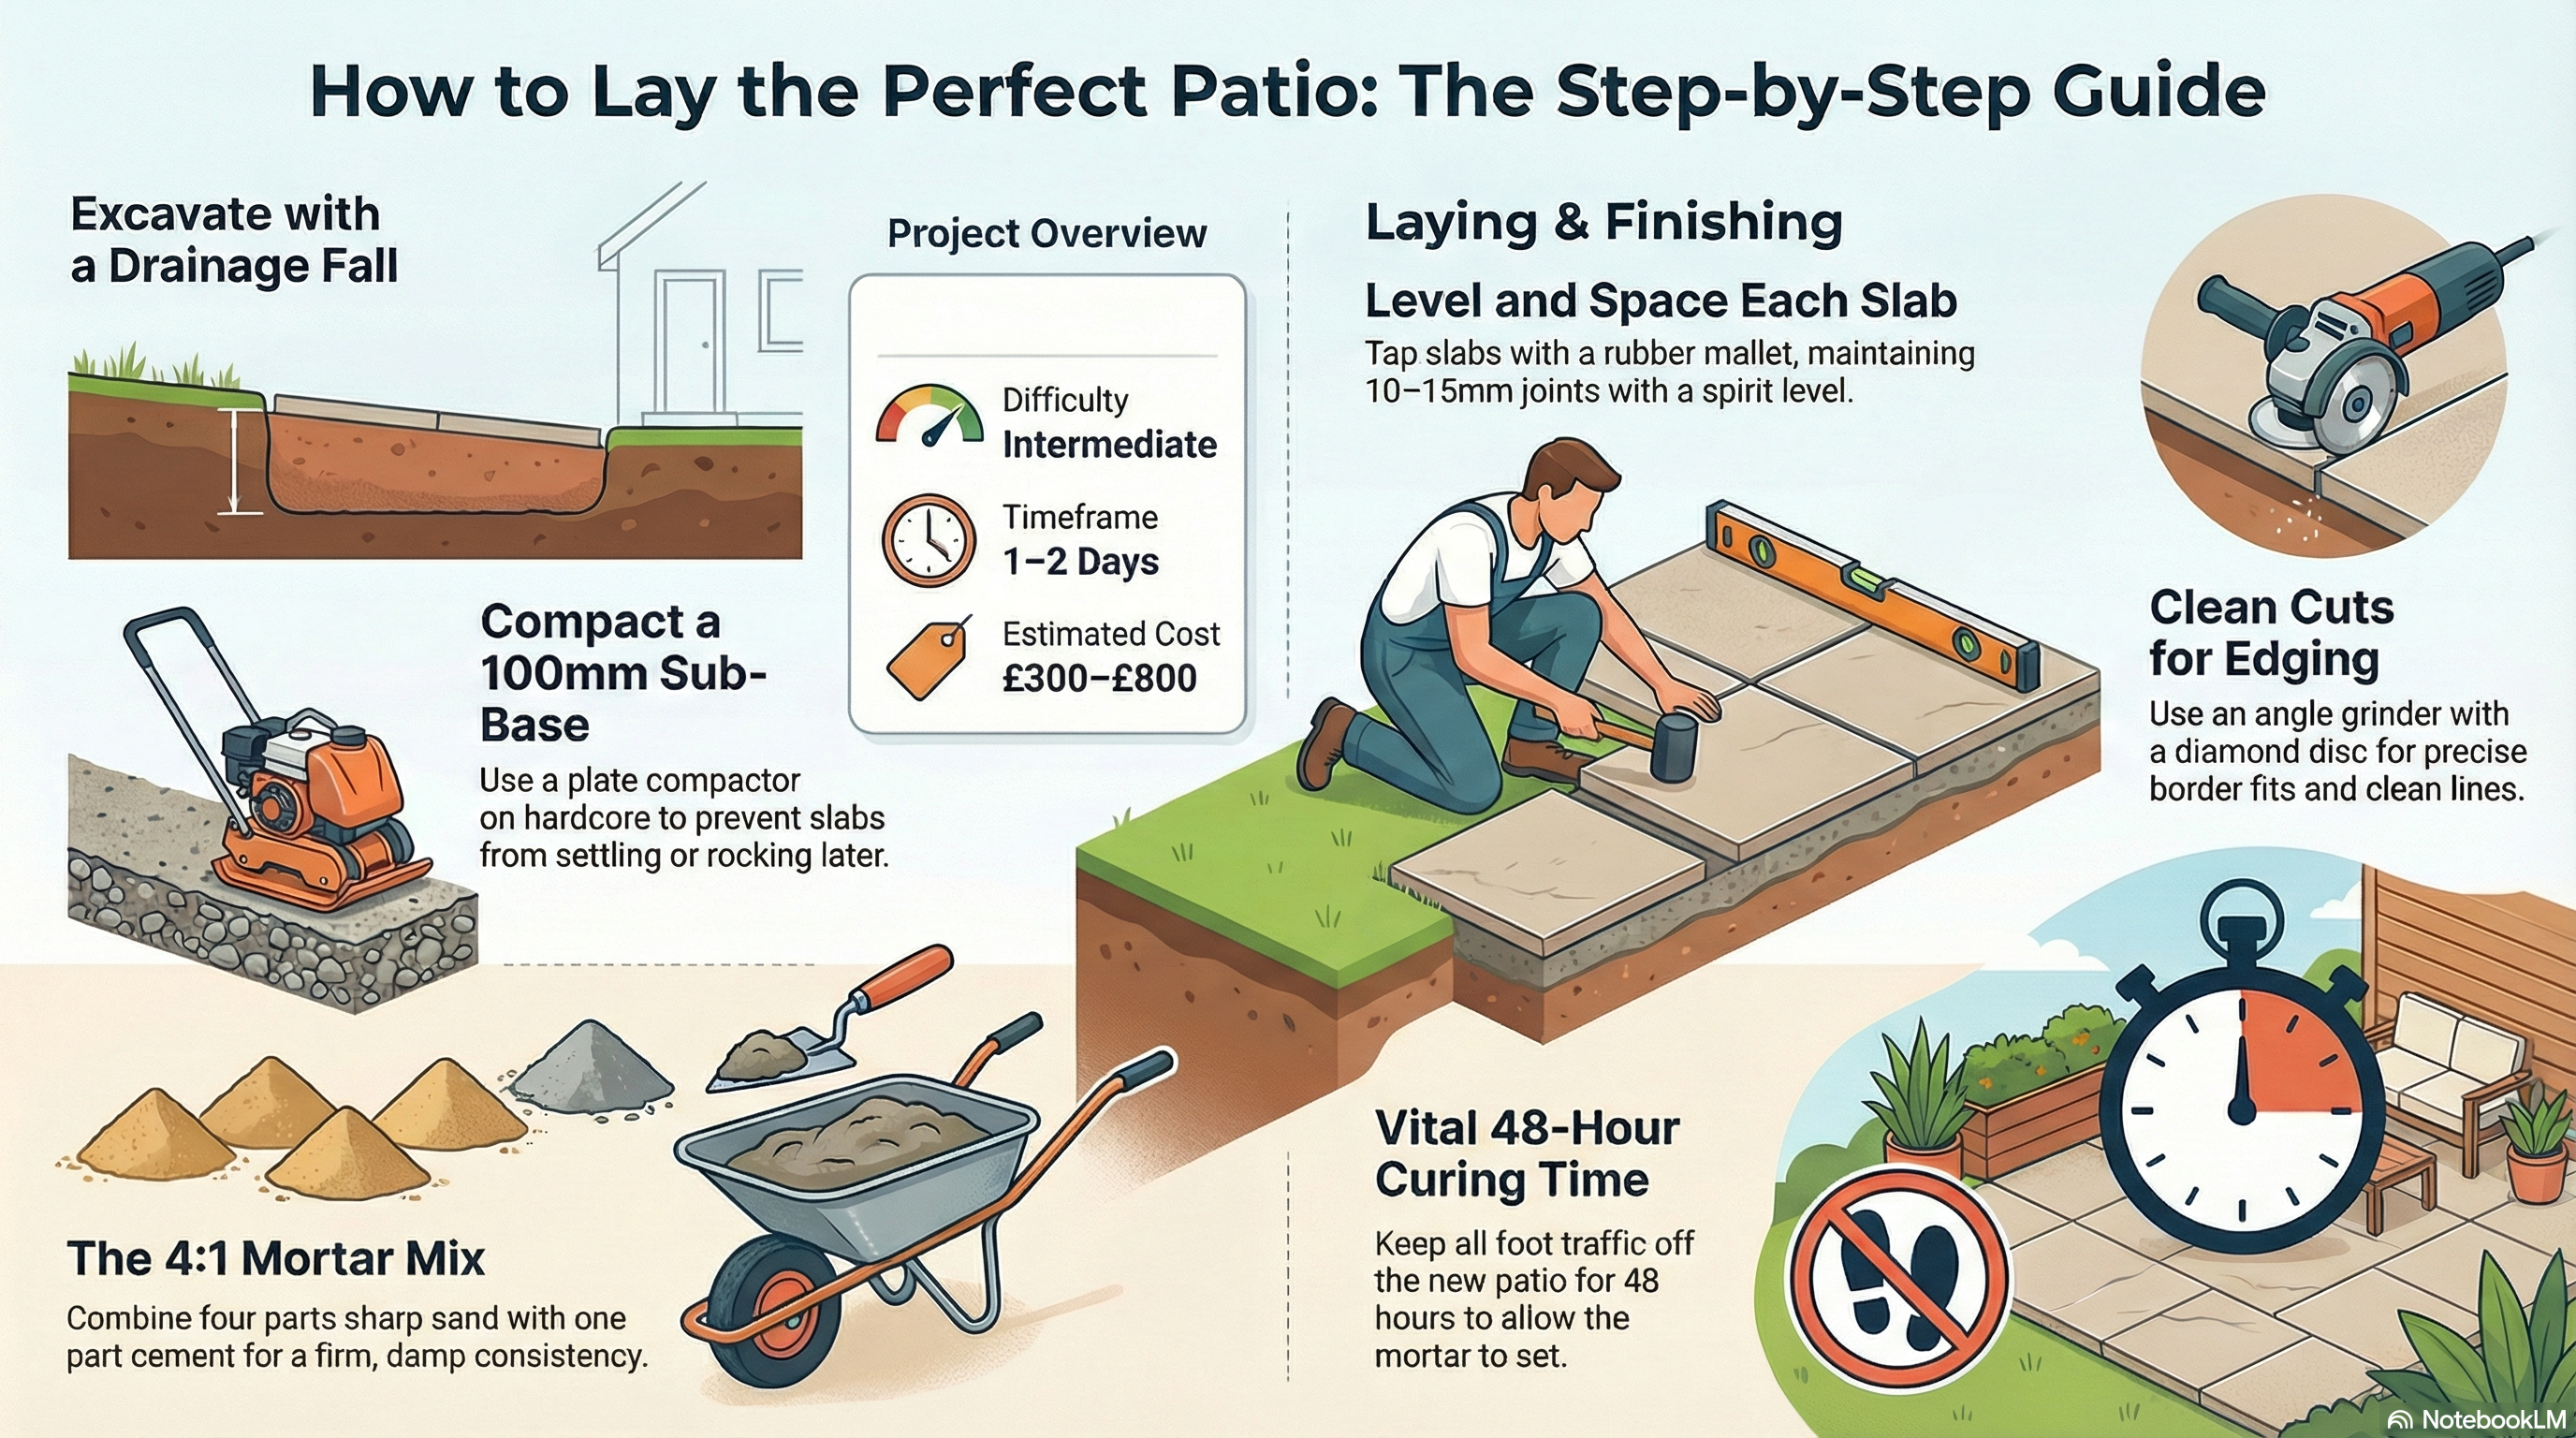
To lay slabs, excavate to at least 150mm depth, compact a sub-base of hardcore, then bed each slab on a mortar mix of four parts sharp sand to one part cement. Tap level with a rubber mallet, maintain consistent joints, and leave mortar to cure for 48 hours before walking on.
 how to lay slabs” style=”width:100%;height:100%;object-fit:cover;display:block”/>
- Spade
- Plate compactor
- Rubber mallet
- Spirit level
- Tape measure
- String line and pegs
- Bolster chisel
- Angle grinder with stone cutting disc
- Concrete paving slabs
- Sharp sand
- Cement
- Hardcore (crushed stone sub-base)
- Jointing compound or dry mortar mix
- Pegs and builder’s line
- Weed-suppressing membrane
Step-by-Step Guide
Mark Out and Excavate the Area
Use pegs and a string line to mark the perimeter of your patio, allowing for a slight fall away from the house of roughly 1:60 (about 17mm per metre) to ensure rainwater drains clear of the building. Excavate to a depth of at least 150mm — more on softer ground — then remove all loose soil, roots, and debris before you do anything else. Getting the excavation depth right at this stage saves every problem that follows.
Compact a Solid Sub-Base
Spread a 100mm layer of compacted hardcore across the entire excavated area, then run a plate compactor over it until the surface is firm and stable with no movement underfoot. A weak or uneven sub-base is the single most common reason patio slabs crack or rock, so do not skip or rush this step. For clay-heavy soil, lay a weed-suppressing membrane before the hardcore to prevent ground movement over time.
Mix and Apply the Mortar Bed
Mix four parts sharp sand to one part cement with just enough water to produce a firm, damp consistency — the mix should hold its shape when squeezed but not be wet or sloppy. Apply the mortar in blobs or a continuous bed at roughly 40–50mm thick, covering only the area you can lay in one session so the mortar does not skin over before the slab goes down. Lay on the blobs in a pattern — five for each slab (one under each corner, one in the centre) — if using the spot-bed method.
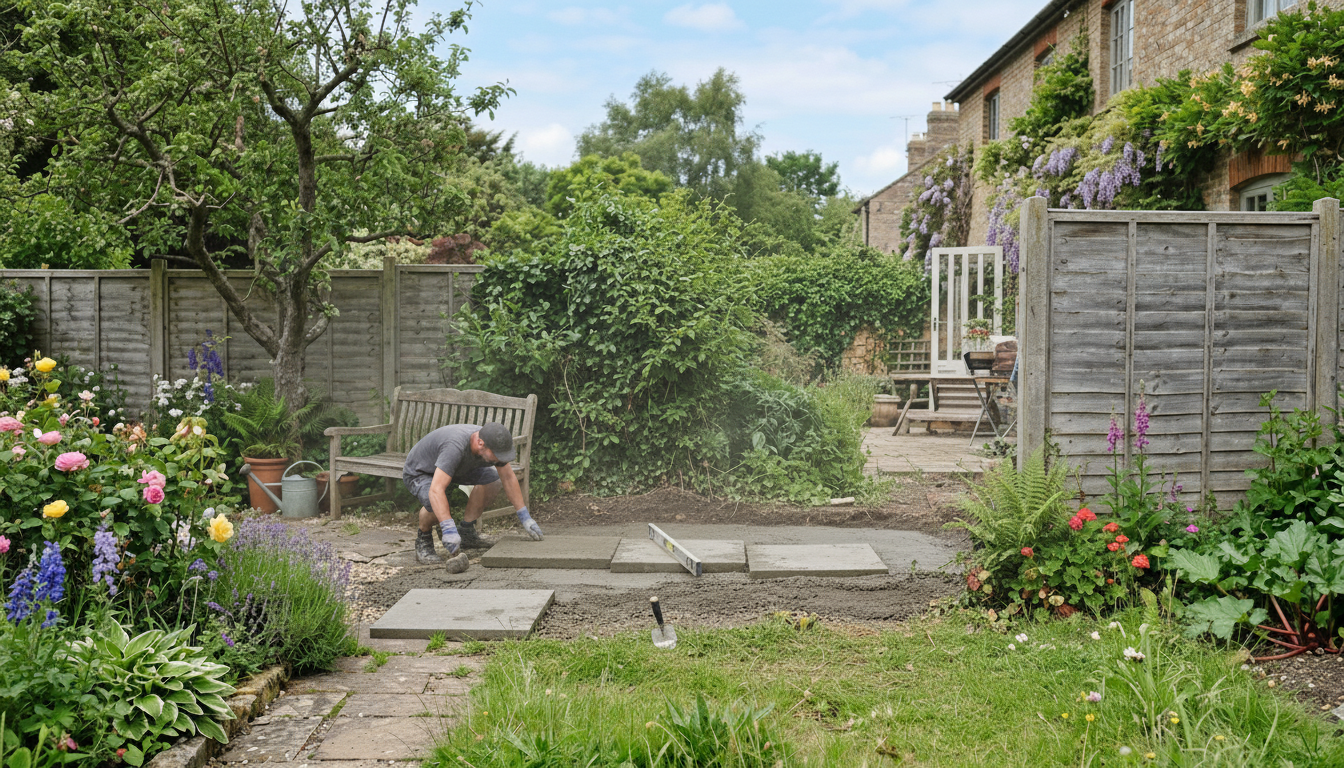
Lay and Level Each Slab
Lower each slab onto the mortar bed carefully — do not slide it — and tap it down firmly with a rubber mallet until it sits level and at the correct height relative to your string line. Check with a spirit level in two directions and across adjacent slabs regularly, and adjust the mortar beneath any slab that rocks rather than forcing it level with excessive tapping. Maintain a consistent joint gap of 10–15mm between slabs using tile spacers or offcuts of timber.
Cut Slabs to Fit Edges
Where slabs need cutting to fit the border, mark the cut line clearly with a pencil and straight edge, score a deep groove with a bolster chisel and lump hammer, then use an angle grinder fitted with a diamond stone cutting disc for a clean, controlled cut. Always wear eye protection, dust mask, and gloves when cutting paving — stone dust is a serious respiratory hazard, and flying fragments are a real risk. Work slowly and let the disc do the cutting rather than forcing it.
Fill Joints and Allow to Cure
Once all slabs are laid and the mortar bed has set for 24 hours, fill the joints using a dry jointing compound brushed into the gaps and lightly dampened with a fine mist of water, or point up with a stiff mortar mix worked in with a pointing trowel. Keep foot traffic off the patio for at least 48 hours and avoid heavy loads for 72 hours to let the mortar cure fully without disturbing the slab positions.
Frequently Asked Questions
Do I need planning permission to lay a patio?
For most front gardens, you will need permitted development approval if the paved area exceeds 5 square metres and uses impermeable materials — a permeable surface or drainage to a lawn avoids this requirement. Rear garden patios are generally permitted development with no application needed, but always check with your local planning authority if you are unsure.
How thick should a mortar bed be for paving slabs?
A mortar bed for paving slabs should be 40–50mm thick when applied, compressing to around 25–35mm once the slab is tapped into position. Too thin and the bond is weak; too thick and the slab is harder to level accurately.
Can I lay slabs on sand only without cement?
Slabs can be dry-laid on a compacted sharp sand bed for lightly used garden areas, but this method offers far less stability and is more prone to movement, weeds pushing through, and slabs rocking over time. For a permanent, structural patio, a mortar bed is always the better option.
How long should I leave a new patio before walking on it?
Wait at least 48 hours before any foot traffic and 72 hours before placing heavy garden furniture or pots on a newly laid mortar-bed patio. Curing time may increase in cold or wet weather — below 5°C, mortar sets very slowly and frost can ruin an uncured bed entirely.
What is the best jointing method for paving slabs?
A brush-in dry jointing compound is the easiest method for DIYers and gives a clean, weed-resistant finish that tolerates slight movement. Wet mortar pointing gives a harder, more durable joint but requires more skill to finish neatly without staining the slab face.
Before you lay a single slab, do a dry run — lay out the full pattern without mortar to check your joint spacing, identify cuts needed, and confirm the fall is correct end to end. Adjusting the layout dry costs nothing; adjusting it once slabs are bedded costs hours.
Sources
- HSE — Silica dust risks when cutting paving and stone — hse.gov.uk
- GOV.UK — Paving your front garden: permitted development rules — gov.uk
- RHS — Hard landscaping: laying a patio — rhs.org.uk
This guide is for general information only. Always work safely and follow manufacturer instructions. DIYnut accepts no liability for injury or damage arising from DIY work.
How to Lay Slabs – Visual Guide