How to Fix a Chipped Kitchen Worktop – DIY Guide
Fix a chipped kitchen worktop by cleaning the damaged area, applying a colour-matched worktop repair filler or resin kit, smoothing flush with the surface, and sealing the edge once cured. Most chips are fixed in under an hour with basic tools.


- Palette knife or filling tool
- Fine-grit sanding block (240-grit)
- Cloth or lint-free wipe
- Craft knife or razor scraper
- Small paintbrush
- Heat gun or hair dryer
- Colour-matched worktop repair filler kit
- Isopropyl alcohol or acetone cleaner
- Fine wet-and-dry abrasive paper (400-grit)
- Matching worktop edge sealant or wax
- Masking tape
- Clear lacquer or worktop finishing oil (if laminate or wood)
Step-by-Step Guide
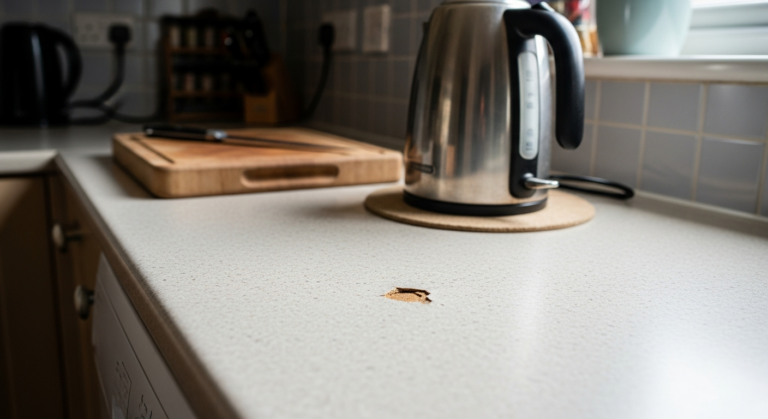
Clean and assess the damaged area
Wipe the chipped area thoroughly with isopropyl alcohol or acetone on a lint-free cloth to remove grease, moisture, and loose debris. Let it dry completely — any contamination under the filler will prevent it bonding and cause the repair to lift within weeks. Check whether the chip is in a laminate, solid wood, or composite surface, as this determines which filler type you need. For advice on wider kitchen maintenance, see our complete Kitchen Guide.
Match the filler colour
Select the closest colour from your repair filler kit — most kits include multiple wax or resin sticks that can be blended together using a heat gun or hair dryer to create a custom match. Test the mixed colour on a piece of masking tape held next to the chip before applying anything to the worktop itself. Getting the colour right at this stage is the single biggest factor in whether the repair is visible or invisible after completion.
Apply the filler in thin layers
Use a palette knife or the applicator tool supplied with the kit to press filler firmly into the chip, slightly overfilling it. Apply in thin passes rather than one heavy fill — thin layers cure without shrinkage or cracking, whereas a thick single application often sinks back below the surface as it hardens. For deep gouges, allow each layer to cure as directed before adding the next. Apply masking tape around the repair to protect the surrounding surface from stray filler.
Trim and sand flush once cured
Once the filler has fully hardened — check the kit’s stated cure time, typically 10–30 minutes — use a sharp craft knife or razor scraper held flat against the worktop to trim any proud material. Finish with 240-grit then 400-grit wet-and-dry abrasive paper, working with the grain on wood surfaces, until the repair sits perfectly flush. Wipe away all dust with a clean damp cloth. If you need to reseal kitchen worktop joins at the same time, do that after this step is complete.
Seal and protect the repaired surface
Apply a thin coat of matching worktop wax, edge sealant, or clear lacquer over the repaired area to protect the filler and blend the sheen level to the surrounding surface. On solid wood worktops, use a food-safe finishing oil rather than a hard lacquer. On laminate, a clear worktop finishing wax is sufficient. Allow to cure fully — typically 1–2 hours — before using the worktop. Moisture getting into an unsealed repair will cause it to discolour or swell, especially on laminate and chipboard-core worktops where water damage spreads quickly.
Frequently Asked Questions
Can I fix a chipped worktop without a repair kit?
For small chips on laminate, clear superglue can stabilise loose flakes, but it won’t fill gaps or match colour. A proper colour-matched repair filler kit gives a far more durable, invisible result and typically costs under £15 from any hardware or kitchen supplies retailer.
Do worktop repair kits work on all worktop types?
Most kits are designed for laminate, but specific products exist for solid wood, granite composite, and Corian-style surfaces. Always check the packaging confirms compatibility with your worktop material before buying — using the wrong product type can cause adhesion failure or visible discolouration.
How do I know if the chip is just cosmetic or structural damage?
My worktop has a chipped front edge — is that harder to repair?
Edge chips are slightly trickier because the filler has less surface area to key into and gravity works against you during application. Build up the repair in very thin layers and support fresh filler with a strip of masking tape held below the edge as a temporary dam while each layer cures.
Is a chipped worktop a hygiene risk?
An unrepaired chip on a kitchen worktop that’s used for food preparation can harbour bacteria, particularly if the core substrate is exposed and absorbs moisture. The UK Food Standards Agency advises that food preparation surfaces should be smooth, non-porous, and easy to clean — repair chips promptly or use a separate chopping board over the area in the meantime. See the reface kitchen cabinet doors guide if you’re refreshing the whole kitchen at the same time.
On laminate worktops with a textured finish, lightly stipple the surface of the wet filler with a crumpled piece of fine cloth or a dry stiff-bristle brush before it fully cures — this replicates the grain texture and makes the repair almost undetectable once sealed. A perfectly smooth fill on a textured surface catches the light differently and gives the repair away immediately.
Sources
- Which? — Kitchen worktop materials and maintenance advice — which.co.uk
- Food Standards Agency — Food hygiene for businesses: surfaces and equipment — food.gov.uk
- HSE — Safe use of chemical cleaning products in the home and kitchen — hse.gov.uk
This guide is for general information only. Always work safely and follow manufacturer instructions. DIYnut accepts no liability for injury or damage arising from DIY work.