How Many Coats of Paint – DIY Guide
How Many Coats of Paint
Get the right number of coats every time for a flawless, lasting finish.
How many coats of paint you need depends on the surface, colour, and product. Most walls need one coat of primer plus two coats of emulsion. Going dark to light or covering bare plaster can require three coats. Woodwork typically needs one undercoat plus two finish coats.


Apply a Mist Coat or Primer on Bare Surfaces
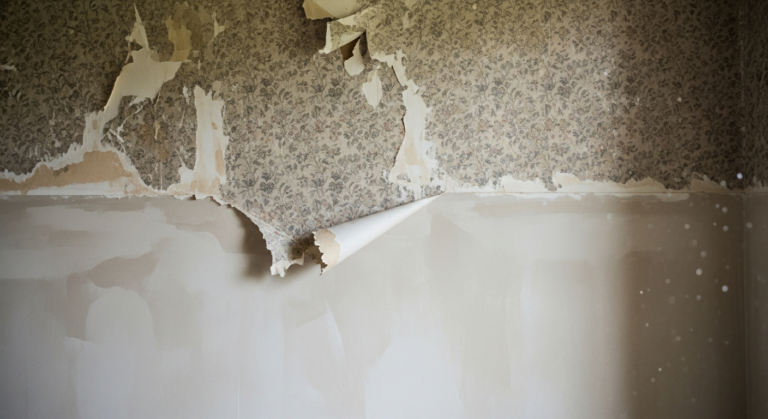
If you are working on new or bare plaster, mix one part emulsion with one part clean water and apply it thinly and evenly across the entire surface using a roller. This is your mist coat and it counts as coat one. Allow it to dry fully — typically two to four hours depending on room temperature and ventilation. On bare wood, apply one coat of wood primer or an all-purpose primer and allow it to dry and harden before sanding lightly with 240-grit sandpaper. Skipping this stage is the most common reason a paint job fails within twelve months.
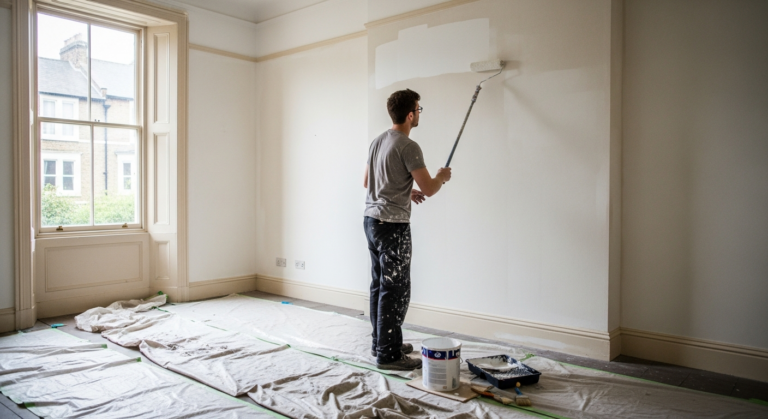
Apply the First Full Topcoat
Load your roller sleeve evenly in the paint tray — no drips, no excess — and work in sections of roughly one square metre, using a ‘W’ motion to spread the paint before filling in. Cut in at edges and corners with a brush before rolling each section. On walls, one full topcoat over a properly primed surface will begin to show coverage. On woodwork, apply your undercoat at this stage — one even coat, brushed out in the direction of the grain. Allow each coat to dry to the manufacturer’s recommended re-coat time, usually two to four hours for emulsion and up to sixteen hours for oil-based undercoat.
Sand Lightly Between Coats on Woodwork
Between each coat on woodwork, lightly sand with 240-grit sandpaper once the coat is fully dry to the touch. This removes dust nibs, brush marks, and any raised grain, giving the next coat a clean surface to bond to. Wipe away all dust with a barely damp cloth before recoating. Walls generally do not need sanding between coats of emulsion unless the surface has picked up dust or there are visible runs. Properly prepping and undercoating wood at this stage is what separates a finish that lasts two years from one that lasts ten.
Apply the Second Topcoat and Check Coverage
Apply your second full topcoat using the same technique as the first. On most walls going from a similar or darker colour, two topcoats over a mist coat or primer will give solid, even coverage. Step back and view the wall from an angle against natural light — this will reveal any thin spots or missed areas. If you can still see the original colour bleeding through after two coats, a third coat is required. This is most common when painting white or a very pale colour over a strong, saturated shade. On woodwork, your second finish coat — gloss or satinwood — should be brushed out thinly and laid off in long, even strokes to avoid brush marks in the dried film.
Apply a Third Coat Only Where Necessary
A third coat is not a failure — it is the correct response to a specific situation. Apply it only where coverage is genuinely uneven after two coats have dried fully. Common situations requiring three coats: painting a white or pastel over a deep red, navy, or dark green; painting new plasterboard that was only spot-primed; and painting exterior walls with a masonry paint onto a porous or previously unpainted surface. Do not apply a third coat wet-on-dry before checking the previous coat in good light — you may find two coats are sufficient once everything has dried down completely.
Frequently Asked Questions
How many coats of paint does a wall need?
Most walls need a mist coat or primer plus two topcoats of emulsion. If you are covering a dark colour with a light one, or painting onto bare plaster, budget for three coats in total. Well-prepared walls in good condition going from a similar colour may be done in two coats without a primer.
Do I need an undercoat before gloss or satinwood on woodwork?
Yes. One coat of undercoat is essential on bare or newly primed wood before applying a finish coat of gloss or satinwood. The undercoat builds opacity and gives the finish coat a surface to bond to. Skipping it results in poor coverage and a finish that chips easily. See our guide to prepping and undercoating wood for the full process.
Can one coat of paint ever be enough?
Only if you are applying a touch-up coat over the same colour on a previously painted surface in good condition. In virtually every other situation — new colour, new surface, colour change — a single coat will not give sufficient coverage or durability.
How long should I leave between coats of paint?
For standard emulsion, allow two to four hours between coats in normal conditions (around 18–20°C). Oil-based undercoat and gloss need longer — typically twelve to sixteen hours before recoating. Always check the manufacturer’s data sheet, and extend drying times in cold or damp conditions.
Does expensive paint cover in fewer coats?
Higher-quality paints generally have a greater pigment load and better hiding power, which can mean solid coverage in two coats where a budget paint might need three. However, proper surface preparation matters far more than paint price — no paint will cover well on a poorly prepped or unsuitable surface.
When switching from a deep to a light colour, ask your paint supplier to tint your undercoat or primer to a mid-tone between the old and new shade — this dramatically reduces the number of topcoats needed for full opacity. A tinted base coat is far cheaper than an extra full tin of your finish colour.
Sources
- Which? — How to paint walls and ceilings — which.co.uk
- HSE — Health and Safety in Paint Application — hse.gov.uk
- Historic England — Practical Building Conservation: Mortars, Renders and Plasters — historicengland.org.uk
This guide is for general information only. Always work safely and follow manufacturer instructions. DIYnut accepts no liability for injury or damage arising from DIY work.