How to Strip Paint from Wood – DIY Guide
Painting & Decorating › Woodwork
How to Strip Paint from Wood
Remove old paint cleanly from wood and get a perfect surface for repainting.
Strip paint from wood using chemical stripper, a heat gun, or coarse abrasive paper. Apply stripper, leave it to work, then scrape back to bare wood. Sand smooth, wipe clean, and the surface is ready for primer and a fresh coat of paint.


- Heat gun
- Shave hook scraper
- Flat scraper
- Detail scraper
- Orbital sander
- Paintbrush (for applying stripper)
- Safety goggles
- Chemical-resistant gloves
- Chemical paint stripper (gel or paste)
- Coarse abrasive paper (80 grit)
- Medium abrasive paper (120 grit)
- Fine abrasive paper (180 grit)
- White spirit or mineral spirits
- Clean lint-free cloths
- Wood filler or stopping compound
- Dust sheets
Step-by-Step Guide
Prepare the Area and Protect Yourself
Lay dust sheets under the work area to catch paint debris, and open windows to ventilate the room — chemical strippers produce strong fumes. Wear chemical-resistant gloves and safety goggles throughout. If the property was built before 1978, treat all paint as potentially lead-based: the HSE recommends using a wet method or paste stripper rather than dry sanding or a heat gun to minimise airborne dust, and disposing of waste as hazardous material. You can find further guidance on lead paint safety on the HSE website.
Choose Your Stripping Method
For flat, accessible surfaces such as skirting boards or door panels, a chemical gel stripper gives the most control and causes least risk of scorching the timber. A heat gun works well on thick paint on frames and mouldings but requires a steady hand to avoid burning the wood. Avoid using a heat gun near glass — thermal shock can crack the pane. For fine detail and moulded sections, a chemical paste stripper applied thickly is the most effective option. If you’re planning to prep and undercoat the wood afterwards, a clean chemical strip is preferable to sanding alone.
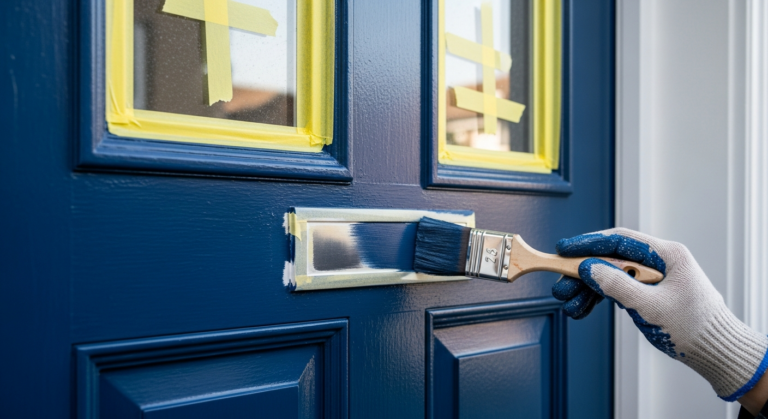
Apply the Chemical Stripper
Decant the gel or paste stripper into a small container and brush it on liberally with an old paintbrush, working in one direction. Build up a thick, even layer — don’t spread it thin or it will dry out before it has time to work. Cover with a sheet of cling film or the foil backing supplied with the product to slow evaporation and improve penetration. Leave to dwell for the time specified on the packaging, typically 20–30 minutes for soft paint and up to an hour for thick gloss.
Scrape Back the Softened Paint
Once the paint has blistered and lifted, remove the cling film and scrape back firmly using a flat scraper on open panels and a shave hook on mouldings and curved sections. Work with the grain where possible. For a front door or other multi-layer surfaces, you may need a second application of stripper to clear stubborn base coats. Collect all scrapings into a waste bag immediately — do not let them sit on surfaces where pets or children could contact them.
Sand the Surface Smooth
Once the bulk of the paint is off and the surface is dry, sand back with 80-grit abrasive paper to remove residue and key the grain, then follow with 120 grit and finish with 180 grit for a smooth, paint-ready surface. An orbital sander speeds up flat areas; hand-sand moulded profiles. Wipe down with a cloth dampened with white spirit to remove all dust and any stripper residue, then allow to dry fully — at least 30 minutes in a warm room. If you spot any dents or splits, fill them with a wood filler or stopping compound, sand flush once dry, and re-wipe. For guidance on repairing damaged timber before painting, see our window sill guide.
Prime and Prepare for Repainting
Bare wood must be primed before painting — skipping this step means topcoats absorb unevenly and peel faster. Apply a coat of wood primer, allow to dry fully per the manufacturer’s drying time, then lightly sand with 180-grit paper and wipe clean before applying your finish coat. If you’re painting a front door or exterior woodwork, use an exterior-grade primer to protect against moisture ingress.
Frequently Asked Questions
What is the easiest way to strip paint from wood?
A chemical gel stripper is the most beginner-friendly method — apply, leave to dwell, and scrape off. It works on most paint types, requires no special skill, and carries less risk of scorching the wood than a heat gun.
Can I use a heat gun on all types of wood?
A heat gun works well on hardwoods and thick exterior joinery, but use it with caution on thin or resinous softwoods, which can scorch quickly. Keep the gun moving and hold it 50–75 mm from the surface to avoid burning.
How do I strip paint from detailed mouldings and carved profiles?
Apply a thick paste stripper and cover with foil to extend the dwell time, then use a shave hook, shaped scraper, or an old toothbrush to work the softened paint out of tight profiles. Avoid coarse abrasive paper on mouldings — it rounds off the edges.
How do I know if I have lead paint?
Any property built before 1978 may have lead-based paint. DIY lead paint test kits are available from hardware retailers and give a quick result. If the test is positive, follow HSE guidance on lead paint removal and dispose of all waste as hazardous material.
Do I need to sand after using a chemical stripper?
Yes — chemical strippers raise the wood grain slightly and often leave a thin residue. Sanding through 80, 120, and 180 grit after stripping ensures a smooth, clean surface that primer and topcoat can bond to properly. See our guide to prep and undercoat wood for the full process.
On deep mouldings, apply stripper, press a length of string into the profile before it sets, then pull the string through once the paint has lifted — it clears the groove in one clean pull without any tool scratching the detail. Follow immediately with a shave hook to catch the edges.
Sources
- HSE — Lead Paint: Information for Homeowners and DIYers — hse.gov.uk
- Which? — How to strip paint from wood — which.co.uk
- Historic England — Practical Building Conservation: Paints and Coatings — historicengland.org.uk
This guide is for general information only. Always work safely and follow manufacturer instructions. DIYnut accepts no liability for injury or damage arising from DIY work.