How to Build Alcove Shelves – DIY Guide
How to Build Alcove Shelves
Turn dead alcove space into fitted shelving that looks built-in from day one.
To build alcove shelves, fix timber battens to three walls of the alcove, cut shelves to fit, drop them onto the battens, and secure them. Sand, fill, and paint for a clean finish. A standard alcove takes a day and costs under £100 in materials.


- Tape measure
- Spirit level
- Pencil
- Cordless drill and drill bits
- Jigsaw or hand saw
- Sanding block or orbital sander
- Paintbrush
- Timber battens (50 × 25 mm PAR softwood)
- Shelf board (MDF or planed softwood, 18 mm)
- Wall plugs and screws
- Wood filler
- Fine-grit sandpaper (120 and 240 grit)
- Primer
- Eggshell or satinwood paint
- Masking tape
Step-by-Step Guide
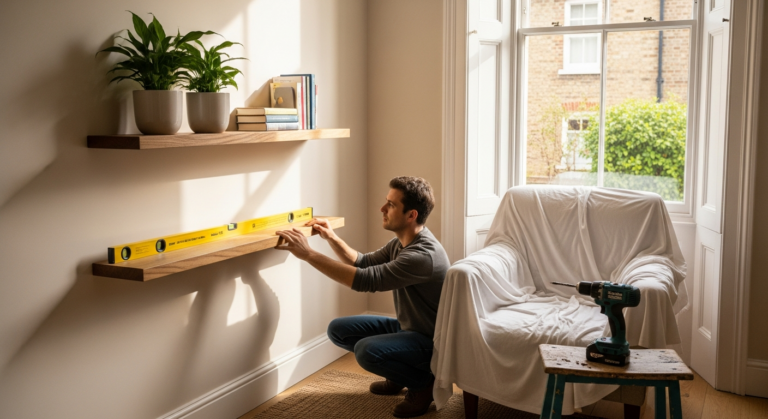
Measure the alcove and plan shelf positions
Use a tape measure to record the width, depth, and height of the alcove at multiple points — alcoves are rarely perfectly square, so measure at the front, middle, and back of each shelf position. Mark shelf heights on the wall in pencil, using a spirit level to keep lines horizontal. Decide on shelf spacing based on what you plan to store: 300 mm for paperbacks, 350 mm for larger items. If you’re unsure what spacing suits your space, our heavy-duty shelving guide covers load-bearing principles in detail.
Fix the battens to the walls
Cut three battens per shelf — one for the back wall and one for each side wall — using a hand saw or jigsaw. Hold each batten on your pencil line, drill through it into the wall (masonry bit for brick or block, wood bit for timber stud), and fix with appropriate wall plugs and screws. Check every batten is level before final tightening. On a brick or plaster wall, use a 6 mm masonry bit and plug with 6 × 30 mm wall plugs; fix at 300 mm centres as a minimum. The battens carry all the load, so fixings into solid wall are non-negotiable.
Cut shelves to size
Transfer your smallest width measurement to the shelf board — cut slightly short (1–2 mm each side) rather than tight, which makes fitting and removing shelves far easier. If the back wall is not plumb, scribe the rear edge of the shelf to match the wall profile: hold the shelf in position, run a pencil along the wall contour, and trim with a jigsaw. For MDF shelves, always sand the cut edges before painting, as they absorb primer quickly and need an extra coat.
Drop shelves onto battens and secure
Lower each shelf onto its three battens and check it sits level — if not, pack the low batten end with a slim timber shim before fixing. Once level, drill two countersunk pilot holes up through each batten into the underside of the shelf and screw together. This pulls the shelf down tight and stops any bounce. Pre-drilling prevents the batten from splitting. For very deep shelves, add a mid-span batten at the back wall to prevent sag under load.
Fill, sand, and prepare the surface
Apply wood filler to any screw heads, gaps at the wall junction, and cut edges that look rough. Once dry, sand flush with 120-grit paper, then finish with 240-grit for a smooth surface ready for paint. Wipe down with a damp cloth to remove all dust. Run a bead of decorator’s caulk along the joint between the shelf edges and the wall, smooth with a wet finger, and allow to dry fully before painting. This is the step that makes site-built shelves look truly fitted rather than DIY.
Prime and paint for a clean finish
Apply one coat of primer to all surfaces, including the underside of each shelf — skipping the underside is a common mistake that shows in a side-lit room. Allow to dry, lightly key with 240-grit paper, then apply two coats of eggshell or satinwood in your chosen colour. Filling and caulking at the wall joint before painting is what separates a professional finish from an amateur one. Allow each coat to dry fully before applying the next.
Frequently Asked Questions
Do I need planning permission to build alcove shelves?
No. Alcove shelving is classed as an internal fitting and requires no planning permission. If you are in a listed building, check with your local authority before making any alterations, including internal ones.
What thickness board should I use for alcove shelves?
18 mm MDF or planed softwood is the standard for most domestic shelving. For spans wider than 800 mm or shelves that will carry heavy loads such as books, step up to 22 mm or add a front-edge lipping to stiffen the board and prevent sag.
Can I build alcove shelves without drilling into the walls?
You can use adjustable shelving track systems that rely on friction and the alcove walls for support, but for a truly fitted look and reliable load-bearing, wall-fixed battens are the correct approach. Fitting heavy-duty shelving with proper wall fixings is always the more secure option.
How do I deal with a skirting board at the base of the alcove?
Either remove the skirting from inside the alcove before fitting the lowest shelf, or notch the back of the shelf board to sit over the skirting profile. Removing the skirting gives a cleaner result. See our guide on removing skirting boards without damage for a step-by-step approach.
How do I make the shelves look truly built-in?
The key is caulking every joint between the shelf and the wall with decorator’s caulk, then painting the shelves, battens, and surrounding walls in the same colour. Adding a filled and painted front batten face disguises the support structure entirely and gives an integrated, furniture-quality finish.
Before cutting any shelf, make a cheap cardboard template of the exact alcove shape and test-fit it first — any scribe or notch required shows up on card, not on expensive board. Tradespeople call this a story rod approach, and it saves costly remakes on awkward or out-of-square alcoves.
Sources
- HSE — Safe use of hand tools — hse.gov.uk
- Which? — How to put up shelves — which.co.uk
- gov.uk — Building regulations: what needs approval — gov.uk
This guide is for general information only. Always work safely and follow manufacturer instructions. DIYnut accepts no liability for injury or damage arising from DIY work.