How to Fit Heavy Duty Shelving – DIY Guide
How to Fit Heavy Duty Shelving
Store more, safely — heavy duty shelving fitted right first time.
Fit heavy duty shelving by locating wall studs or using cavity fixings rated for your load, fixing a robust bracket system at correct spacings, then securing solid shelving boards level and square. Use a spirit level throughout and never exceed the bracket manufacturer’s stated load rating.


- Cordless drill
- Spirit level
- Stud finder
- Tape measure
- Pencil
- Masonry drill bit set
- Screwdriver bits
- Hacksaw
- Heavy duty wall brackets
- Coach screws or structural screws
- Rawl plugs (masonry anchors)
- Solid timber shelving board (minimum 18 mm thickness)
- Wall plugs rated for load
- Sandpaper (medium grit)
- Wood primer and paint or wood oil
- Short screws for fixing board to bracket
Step-by-Step Guide
Identify Your Wall Type and Load Requirements
Before ordering any fixings, establish what your wall is made of — solid brick, block, timber-framed stud, or plasterboard on a timber frame. Each wall type requires a different fixing method: masonry walls take expanding anchors or threaded masonry bolts, while stud walls need screws driven directly into the timber studs. Estimate the total load the shelving will carry — books and tools are heavy, so always work to the bracket manufacturer’s stated maximum load rating per bracket, not a rough guess.
Mark Out Bracket Positions Accurately
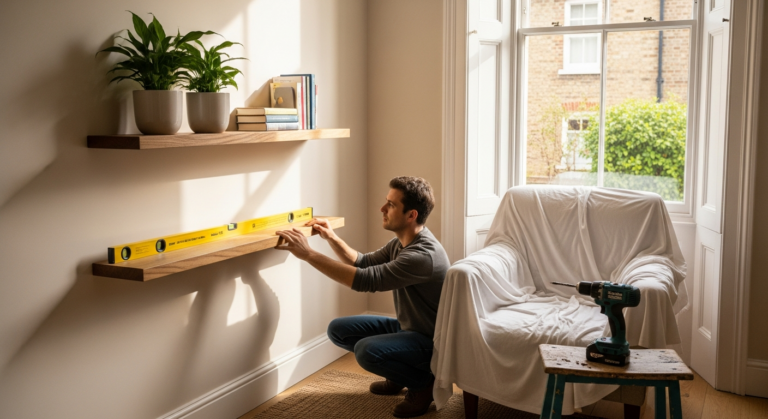
Use a stud finder to locate studs if you are fixing into a stud wall, then mark each position with a pencil. For masonry walls, space heavy duty brackets no more than 450–600 mm apart for loaded shelves — closer spacing is always safer with dense loads. Use a spirit level and tape measure to confirm all bracket positions are level with one another before drilling a single hole. Getting this right at the marking stage saves you filling unnecessary holes later.
Drill Fixings Holes and Fit Wall Plugs
Select a masonry drill bit matched to the diameter of your wall plug or anchor, and drill to the correct depth — typically the length of the plug plus 5 mm. Blow dust from each hole before inserting the plug. For heavy loads on masonry, use a sleeve anchor or a resin anchor rather than a standard plastic plug; these provide significantly greater shear and pull-out strength. On stud walls, drive structural screws directly into the centre of each stud without a plug.
Fix Brackets to the Wall
Offer each bracket up to its marked position and drive fixings in hand-tight first, then check the bracket is plumb with a spirit level before fully tightening. For bracket systems with an upright rail (such as slotted uprights), fix the first upright perfectly plumb, then use a spirit level to set the second upright level with the first before fixing. Unlike floating shelf systems, heavy duty brackets require every fixing to be fully torqued down — do not leave any screws finger-tight.
Cut and Prepare Your Shelving Board
Cut your shelving board to length with a panel saw or circular saw, ensuring the cut is square. Sand the cut ends smooth and apply your chosen finish — wood primer and paint, or a penetrating oil — before fixing. A finished board is far easier to coat before it is on the wall than after. For very long spans, use 25 mm thick solid timber or a laminated board to prevent sagging under load; 18 mm boards should span no more than 600 mm between supports without additional bracing.
Secure the Board to the Brackets and Check Level
Lay the prepared board across the brackets and check it is level end to end with a long spirit level. Fix the board down using short screws driven up through the bracket holes into the underside of the board — this stops the board lifting or shifting under load. Give the fitted shelf a firm downward press and a lateral push to confirm there is no movement. If you plan to build out a full alcove shelving run, repeat the process for each shelf, checking level at every stage rather than assuming the floor or ceiling is your reference.
Frequently Asked Questions
How much weight can heavy duty shelving hold?
This depends entirely on your fixing type, wall construction, and bracket rating — not the shelf board itself. Always check the manufacturer’s stated load rating per bracket and size your bracket spacing accordingly. The HSE recommends that storage systems in workplaces are assessed for load capacity; the same principle applies at home.
Can I fit heavy duty shelving on a plasterboard stud wall?
What is the best fixing for heavy duty shelving on a brick wall?
For brick or block walls, use a sleeve anchor (also called a frame anchor) or a resin anchor for the highest load ratings. Both expand mechanically or chemically within the masonry and provide far superior pull-out and shear resistance compared to standard plastic wall plugs.
How far apart should heavy duty shelf brackets be spaced?
For shelves carrying heavy loads, space brackets no more than 450–600 mm apart. For 18 mm boards, err towards 450 mm. For 25 mm solid timber boards with moderate loads, 600 mm is acceptable. Always fit a bracket within 50 mm of each end of the board to prevent the ends tipping under load.
Do I need to finish the shelving board before fitting it?
It is strongly recommended. Applying your primer, paint, or oil finish before the board goes up is far easier than working around brackets and a wall. It also seals the underside and cut ends, which are often left bare and are most susceptible to moisture and wear.
When using slotted upright systems, pack behind each upright with a thin timber shim at every fixing point rather than pulling the whole upright tight to a slightly uneven wall — this keeps the upright truly plumb rather than following the wall’s imperfections, which is what causes shelves to slope on an otherwise level system.
Sources
- HSE — Safe storage and shelving in the workplace — hse.gov.uk
- Which? — How to put up a shelf — which.co.uk
- gov.uk — Building regulations and structural alterations — gov.uk
This guide is for general information only. Always work safely and follow manufacturer instructions. DIYnut accepts no liability for injury or damage arising from DIY work.